Customize the NAV report (XLSX)
Learn how to create a custom version of the XLSX report which is exportable from the FA Fund Management App interface.
 |
Overview
This tutorial teaches you how to customize FA's standard NAV report (XLSX) that is exportable from the FA Fund Management App interface:
Add a new tab/worksheet to the standard NAV report.
Add custom data to it.
Make the report exportable from the FA Fund Management App interface.
Steps
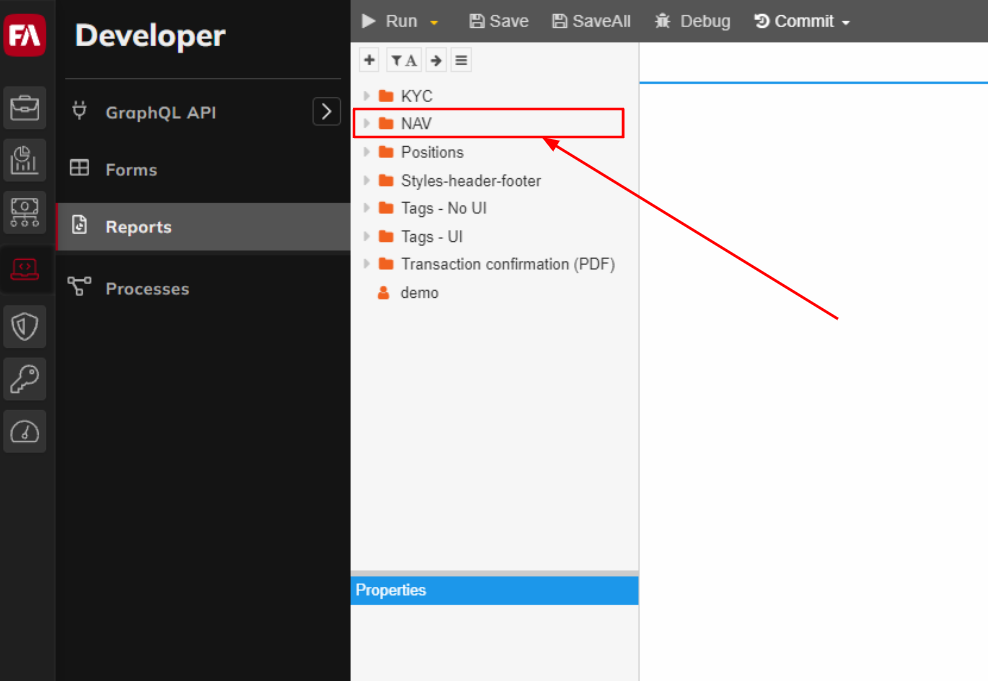
Step 1 - Locate the standard NAV report directory
Locate the NAV report directory, which is named NAV. This directory contains all standard NAV report content that is used by default by FA Fund Management App to generate the PDF and XLSX reports.
 |
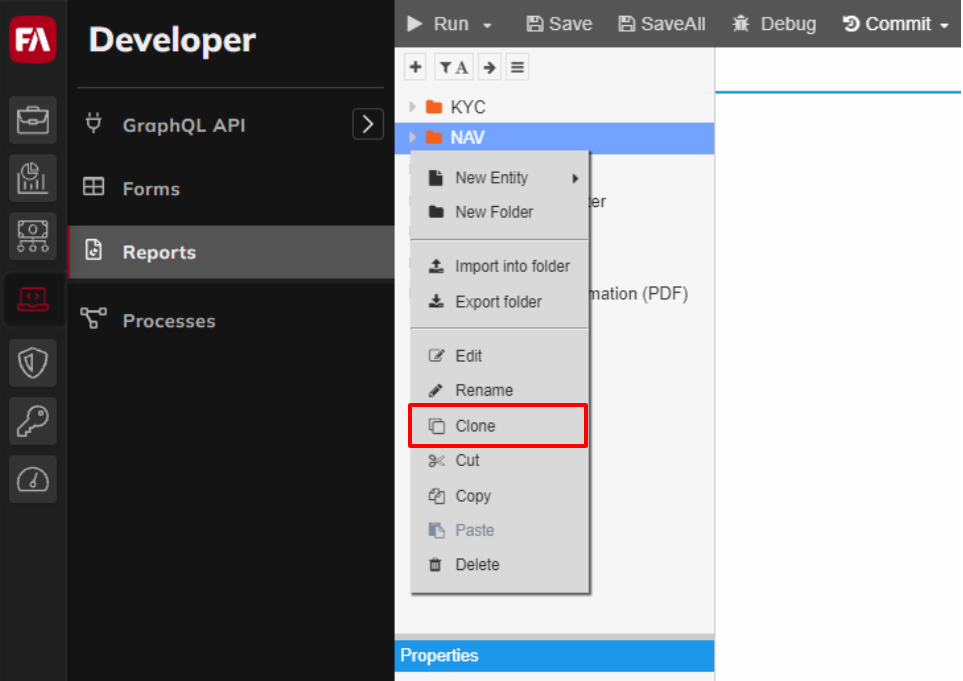
Step 2 - Clone the NAV directory
Create a copy of the NAV directory. To do this, right-click the NAV directory and choose Clone. Enter a name for the new directory. In this tutorial, the name is NAV(custom).
 |
Step 3 - Clone the XLSX report worksheet
Open the NAV(custom) directory you created. Find the excelSheets subfolder with the worksheets of the NAV XLSX workbook. Open it and find the excelSheets subfolder with the preview file. This is the "Preview summary" sheet of the XLSX report.
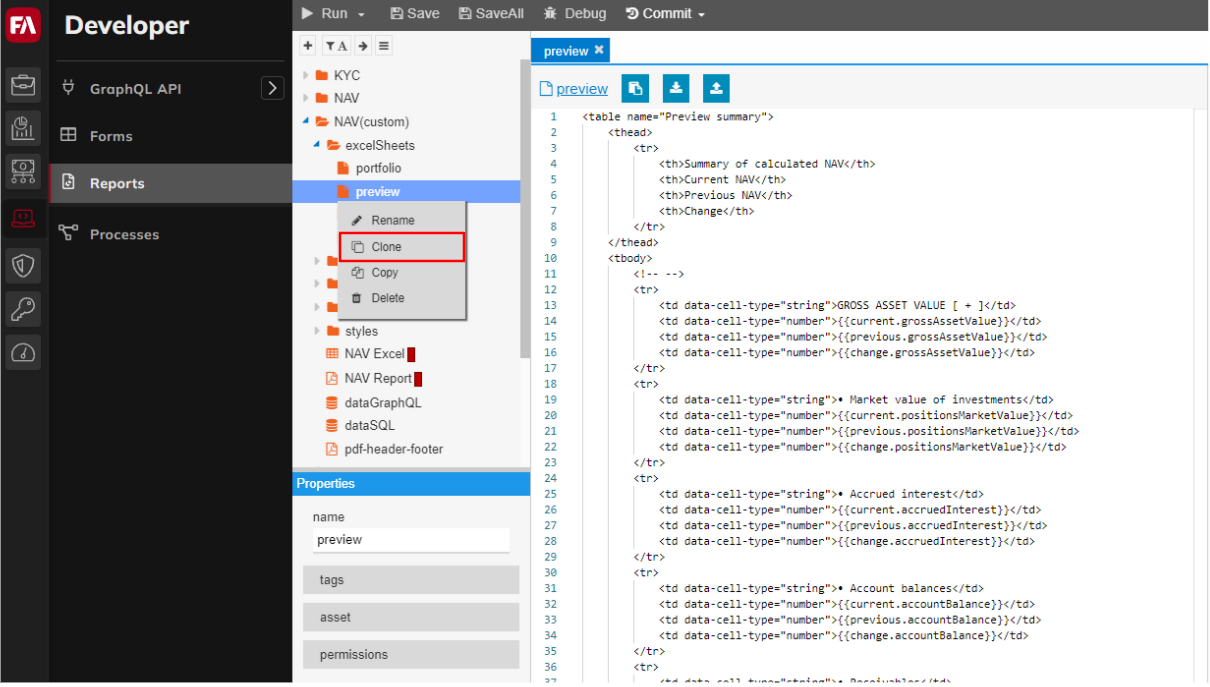
Create a copy of the preview file: right-click the file, choose Clone and enter a name for the copy. In this tutorial, the name is preview(custom).
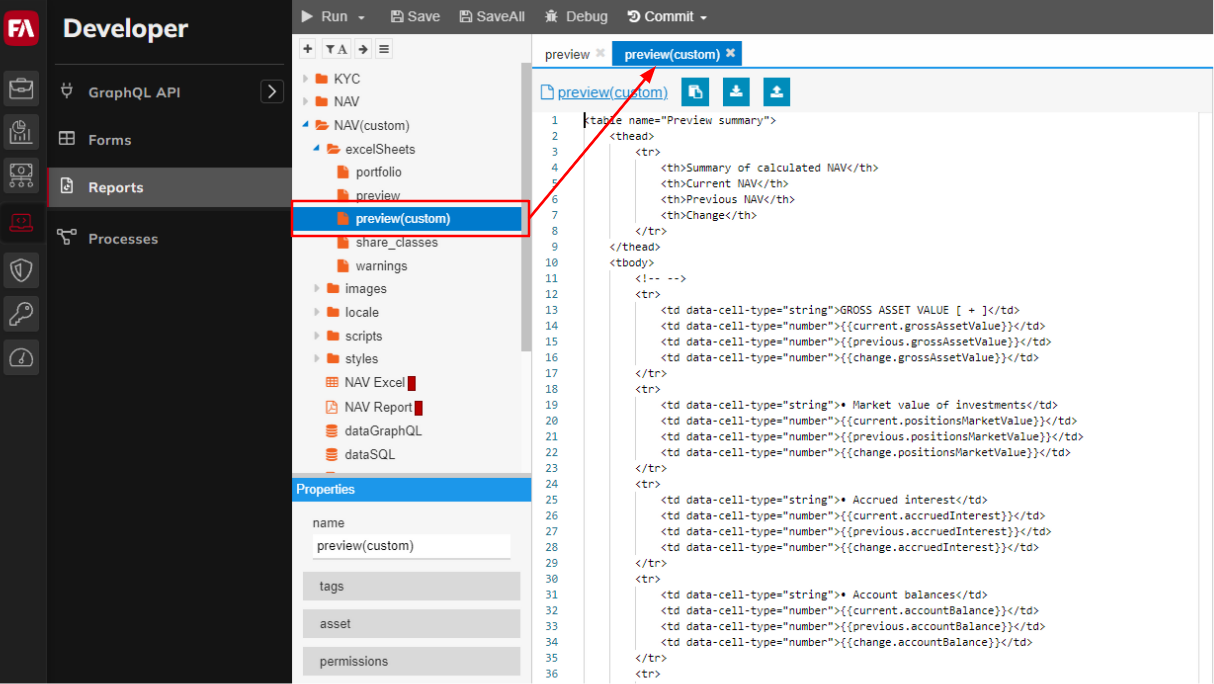
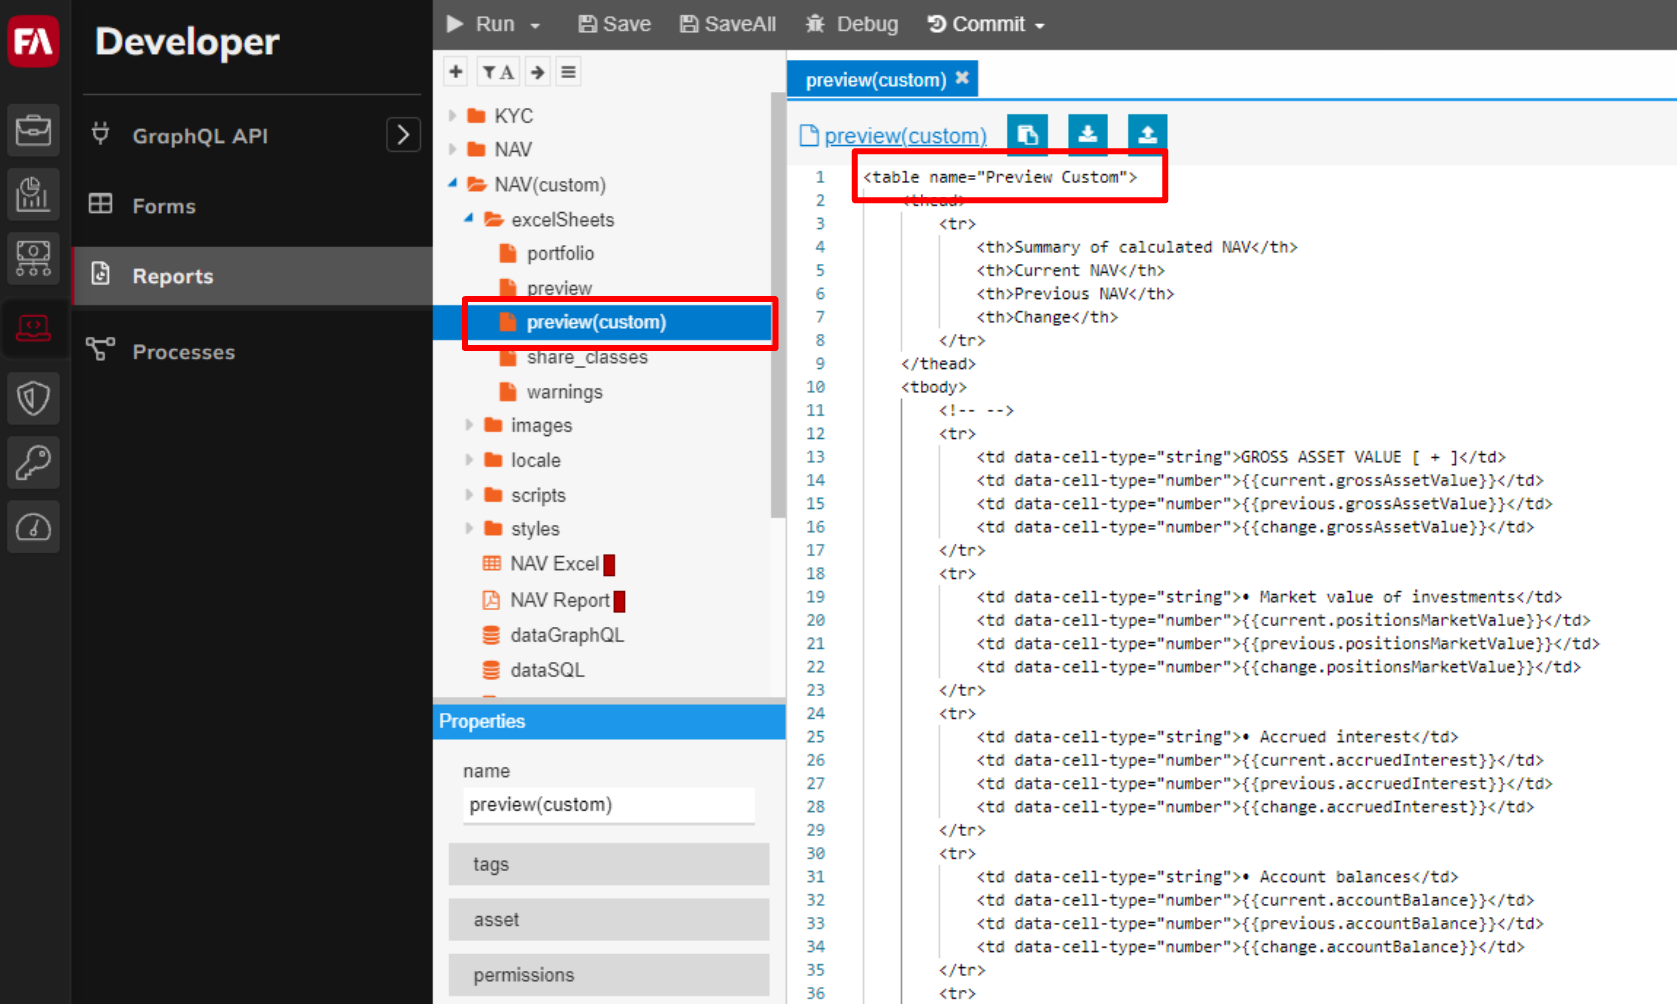
Step 4 - Change the name of the table element
Change the name of the table element in the newly cloned worksheet to avoid a conflict with the table name of the original preview file that you just cloned. The table element name is the name of the XLSX worksheet, so it should be descriptive. In this tutorial the name is Preview Custom.
 |
Step 5 - Add a reference to your new sheet
Open the NAV Excel file. It is an XLSX workbook – the document that contains the sheets in the excelSheets subfolder. Add the code to include the sheet you cloned in Step 3. To do this, copy the following code into the NAV Excel file, as shown in the red-marked area in the screenshot:
{{!-- Sheet for Custom Preview summary --}}
{#asset ./excelSheets/preview(custom)}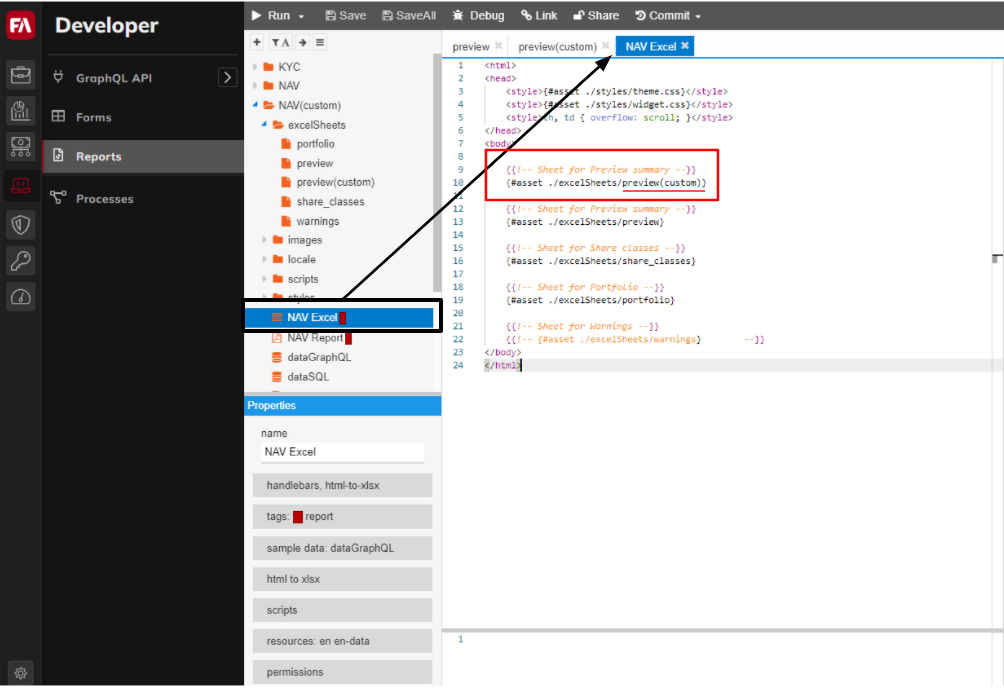 |
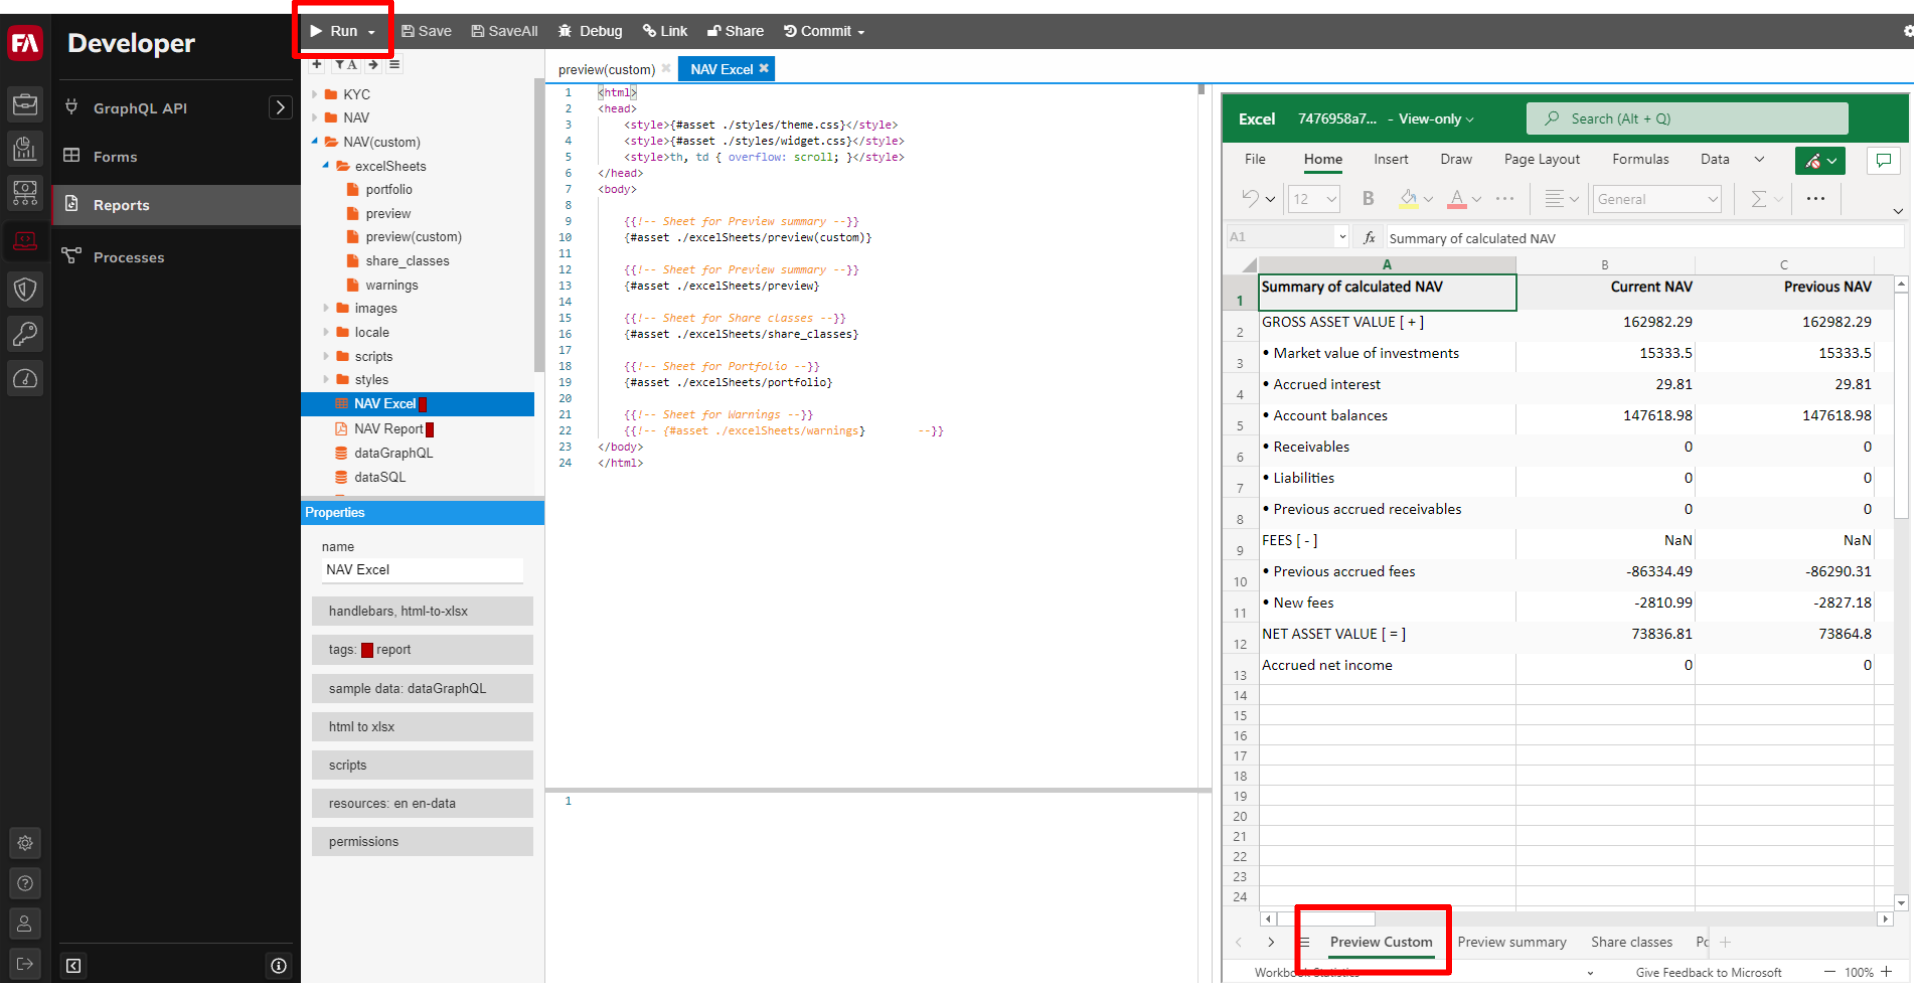
Step 6 - Verify that the new worksheet was added
Choose the NAV Excel file and click Run. This should load the report using dummy data from the dataGraphQL file. It should now include the new sheet you cloned, renamed and added. Now you have your own sheet to customize as you wish, in addition to the standard ones that are preserved.
 |
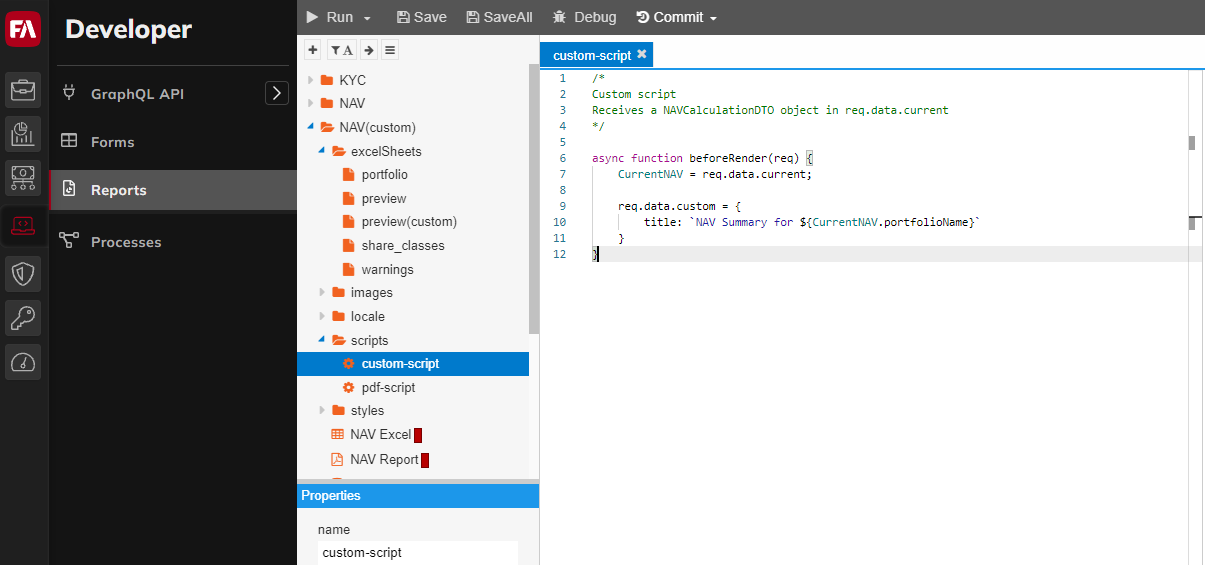
Step 7 - Create a custom script file
After you have created a new sheet and added it to the workbook, add your custom data to it:
Create a custom script. Right-click the scripts folder, choose New entity > script and enter a file name. In this tutorial the name is custom-script.
Note
There might be an excel-script file in the scripts folder too. Leave it untouched.
Open the custom-script file and add the following code to it:
/*
Custom script
Receives a NAVCalculationDTO object in req.data.current
*/

async function beforeRender(req) {
    CurrentNAV = req.data.current;

    req.data.custom = {
        title: `NAV Summary for ${CurrentNAV.portfolioName}`
    }
}
The
beforeRender()function is run prior to a report's rendition. You can do all your data transformations inside this function, and finally make the data available to the report by tagging it onto the req.data object, as it is done with the custom object in the above code. The above code block creates a stringNAV Summary for <name of the portfolio>,which you can then use in your report.Note
The NAV report will receive an NAVCalculationDTO object in the following properties:
req.data.current contains the NAV calculation data from the requested date.
req.data.previous contains the calculation data for the previously accepted NAV.
req.data.change contains the difference between the current and previous NAV calculations.
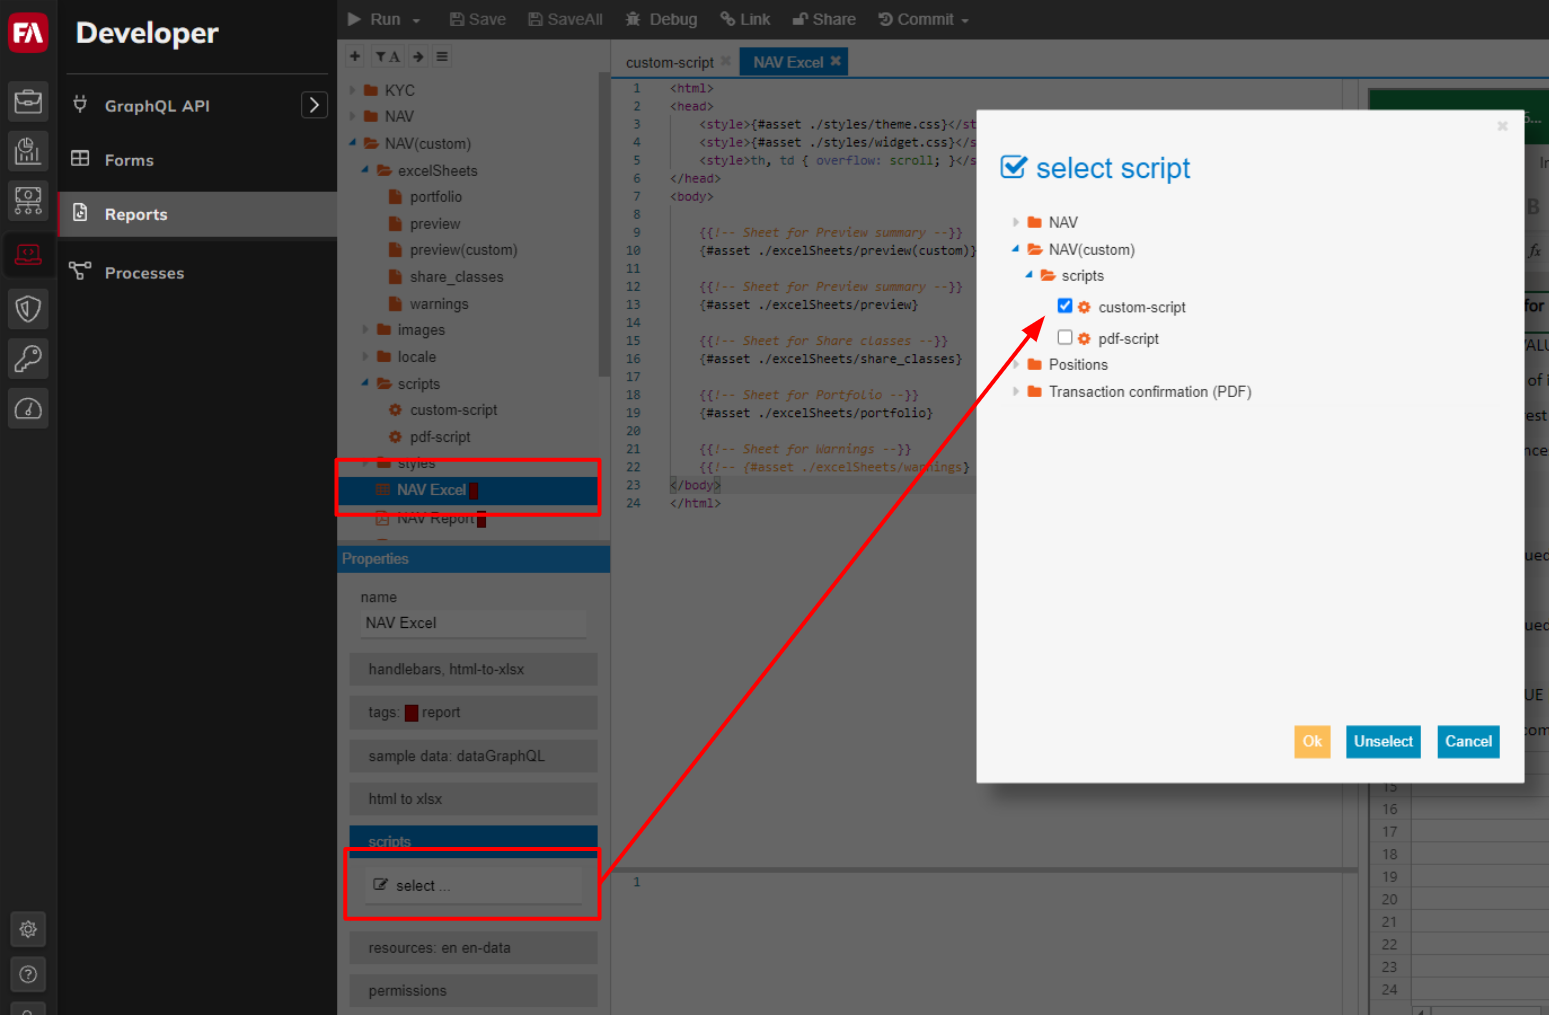
Step 8 - Attach the custom script
To make use of your custom script, attach it to the NAV Excel file, as shown on the screenshot. Then run the script by choosing the NAV Excel file and clicking Run.
 |
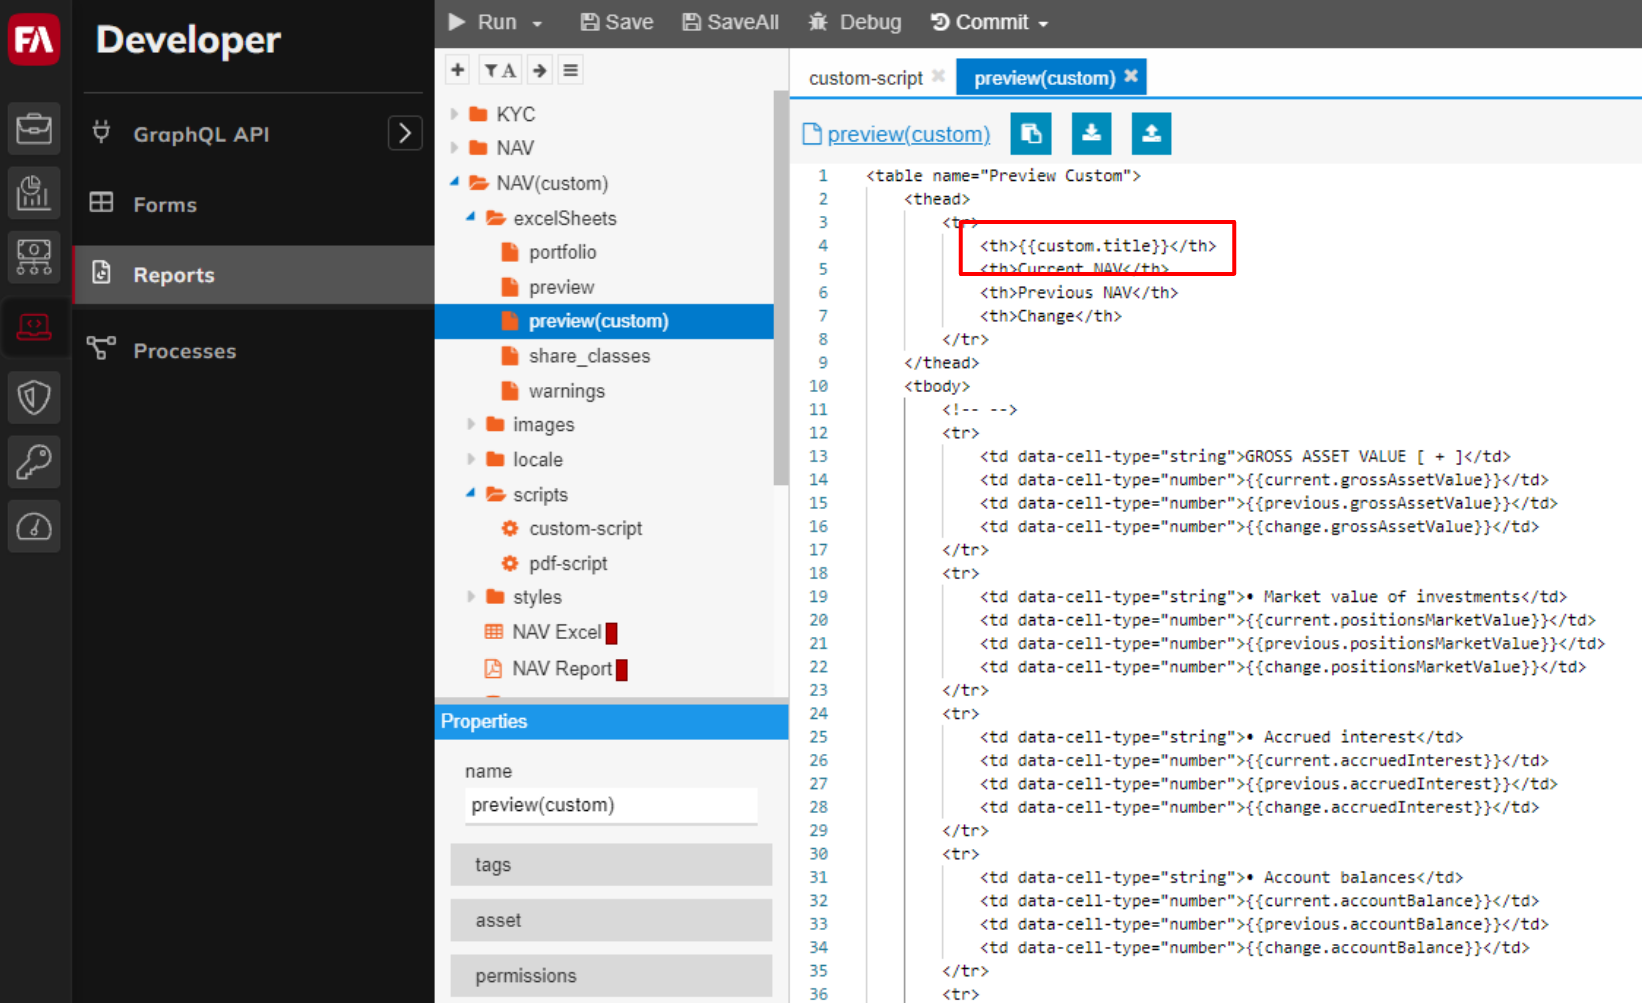
Step 9 - Add the custom data to the report
In step 7, you created a script that added the NAV Summary for <portfolio name> string in the title variable inside the custom object tagged onto the report data. You can now refer to it in a worksheet with {{custom.title}} (in double brackets).
{{custom.title}}Add this to the preview(custom) worksheet you created earlier in step 3 and 4, as shown in the screenshot.
 |
Step 10 - Confirm that the custom data is working
In the previous step, you added custom data in the new NAV report worksheet. Try if everything works: choose the NAV Excel file and click Run. In the preview(custom) worksheet, it should now say NAV Summary for <portfolio name>. As the report is run directly inside jsreport, it uses the dummy data in dataGraphQL to populate <portfolio name>. In this tutorial, the dummy data used resulted in FA Equity + . However, if you run the report from FA Fund Management App, <portfolio name> is replaced with the name of your fund portfolio.
 |
Step 11 - Enabling the Custom NAV Summary Report
In FA Back, open your fund portfolio and go to the Fund Settings > Reporting tab. Define the path for FA Fund Management App to locate your custom report in the NAV report name (xlsx) field. The path is /<folder_in_jsreport>/<report_template_file>. If you followed the naming in this tutorial, the path is:
/NAV(custom)/NAV Excel
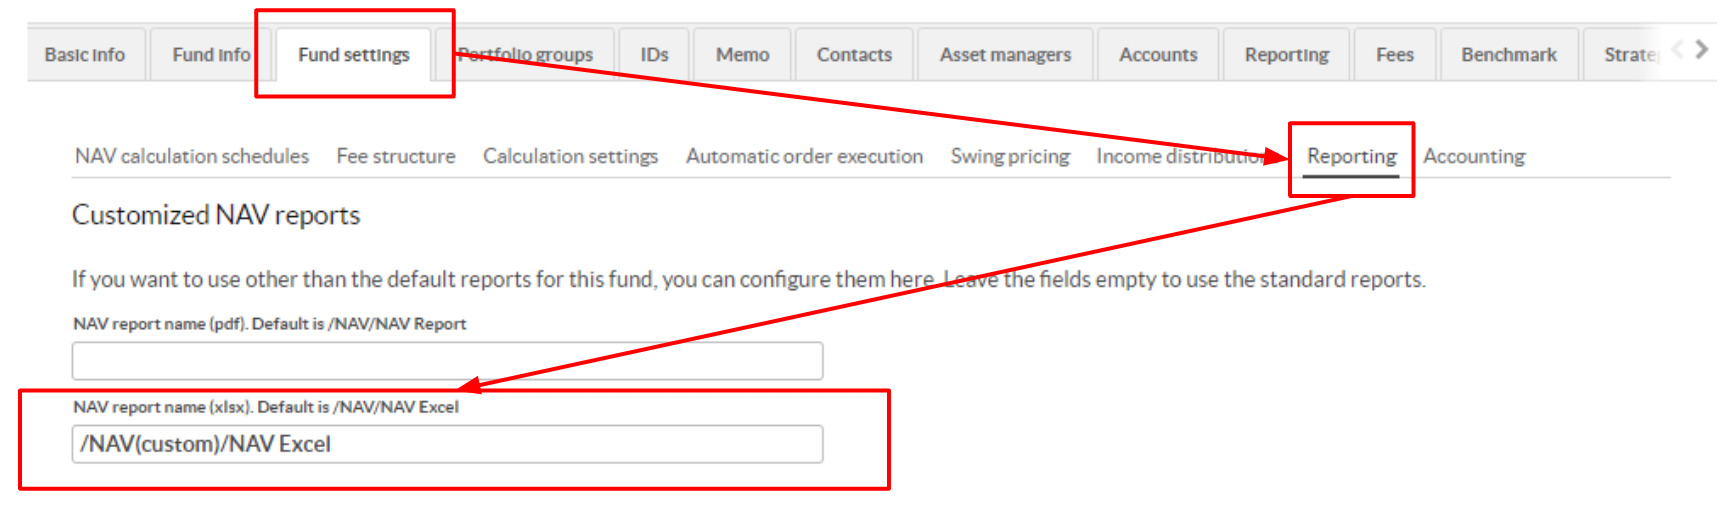 |
This makes FA Fund Management App use the custom XLSX report you created.
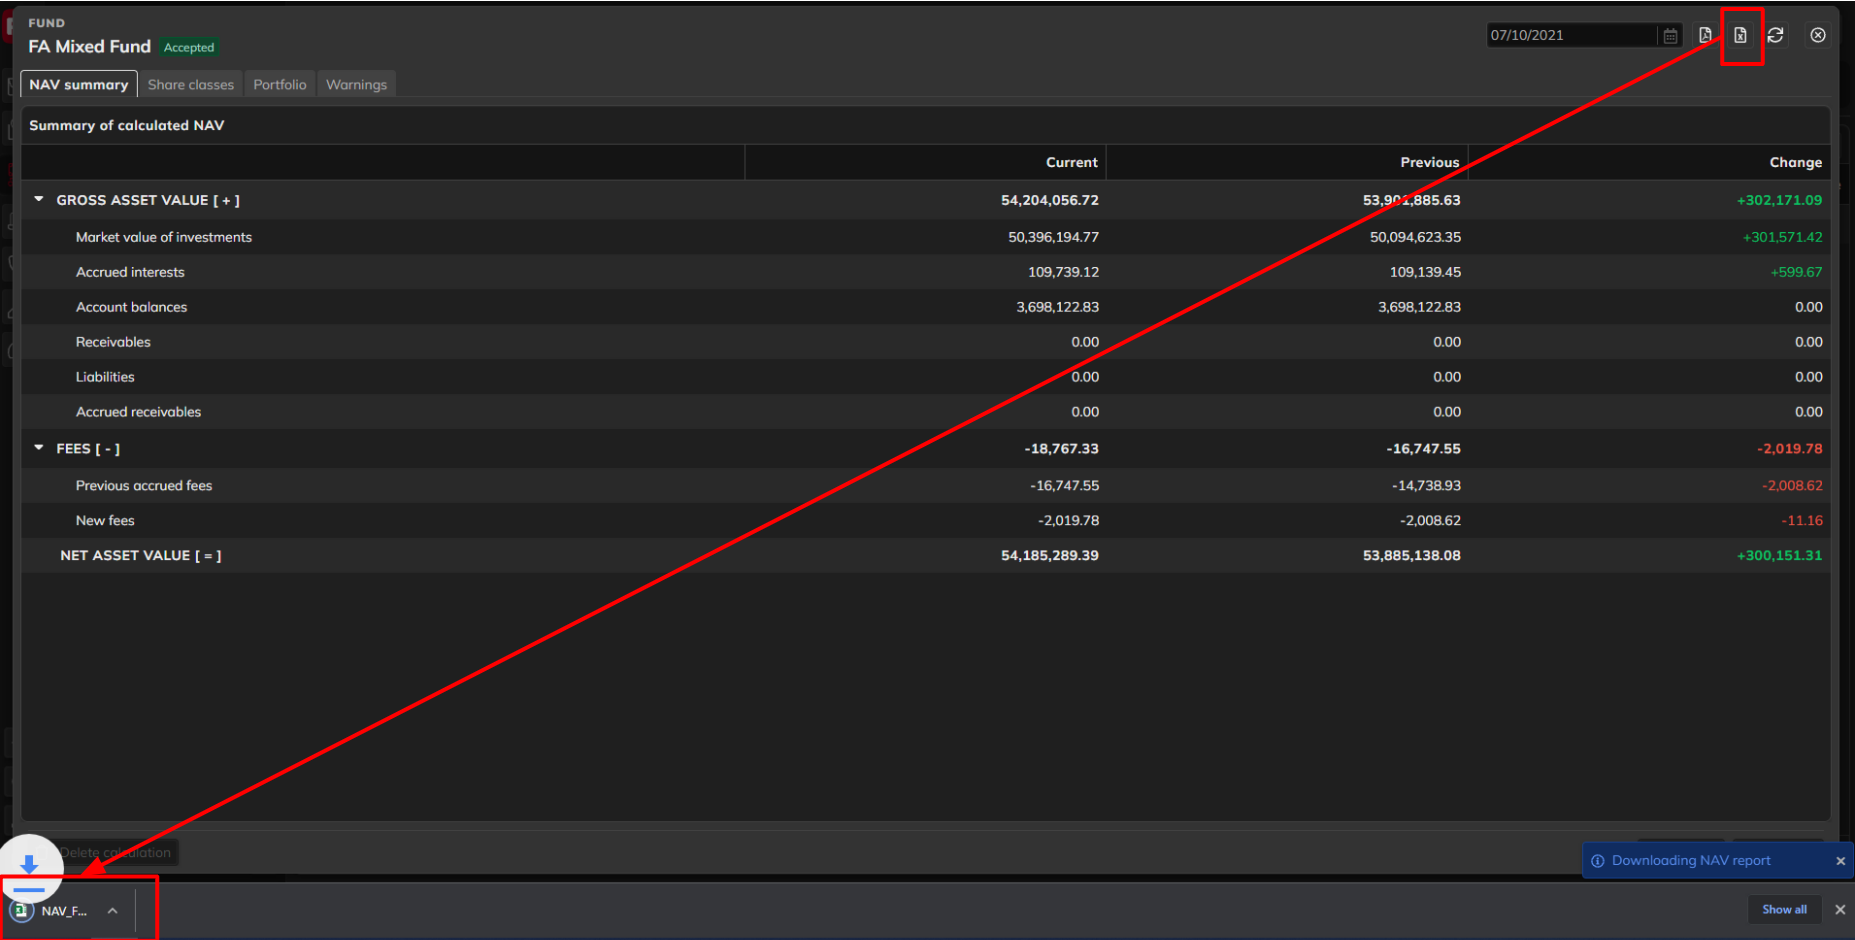
Step 12 - Verify that the report is exportable from FA Fund Management App
In step 11, you replaced the report generated when clicking the XLSX icon  in FA Fund Management App with a custom version.
Verify that it works:
Open FA Fund Management App and find the fund for which you have changed the path to the NAV Excel report in step 11.
Double-click a fund to open the NAV window.
Click the XLSX icon
to download the custom NAV report XLSX.