Auto import
Auto import allows you to import contacts, portfolios, securities, market prices, transactions or trade orders to FA with an FA Format file.
Files can be imported automatically through the following steps through Import - Auto import:
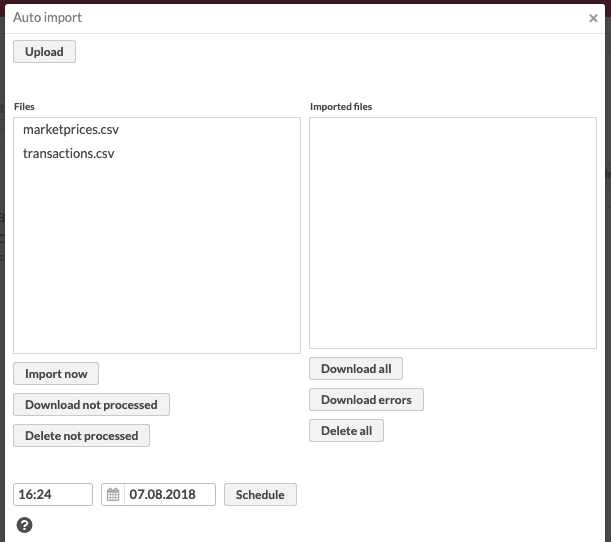
Upload the file you want to import to the system with the Upload button. The uploaded file appears on the "Files" section on the left.
Once you have uploaded all the files you want to import, you can can either import the files to FA immediately with the Import now button OR you can schedule the uploaded files to be imported later by defining the time and date of the import and clicking Schedule.
After the files have been imported, one or more files are created to the "Imported" files section on the right. These files list separately the successful and failed imports.
In addition to allowing you to schedule your imports for example night time, the auto import function facilitates manual importing: auto import allows you to process multiple FA Format files at once, and you don't need to import each file separately.
In order for the automatic import to work, the files have the follow the FA Format (see file formats for contacts and portfolios, securities and security prices, and transactions and trade orders), and the files have to be named in the following way:
securities.csv - security file
transactions.csv - transaction file
marketprices.csv - market price file
contacts.csv - contact file
portfolios.csv - portfolio file
If there are multiple files of the same type within the imported files (for example if you have defined your market prices in different files), the files can be numbered in a form filename-x.csv (for example marketprices-2.csv).
You can also upload files as a zip package: you can save multiple files in the same folder and compress it into a zip package. The system automatically decompresses the zip package when it is uploaded to the system, and each individual file saved in the zip package appears in the "Files" section on the screen.
The files need to be encoded in the Windows-1252 format, regardless of what encoding is selected in Preference - Importing. If the files contain special characters that require UTF-8 encoding, you can use the general importer (see Import data via general importer format files to the system in FA User guide).
Automatic import is started by uploading the files to be imported to the server. The Upload button at the upper-left hand corner of the automatic import window opens up a menu, from which the automatically imported file is chosen. Files uploaded to the server can be seen in the Files listing on the left.
- Files: x
Files: x - the files uploaded to the server are listed on the left with the name of the file. The heading of the also shows the number of files uploaded to the server (for example, Files: 1 indicates, that one file has been uploaded). The listing shows all the files uploaded with the Upload button, and you can perform functions to the files with a right-click of your mouse
Open - downloads the chosen CSV file to your computer, when you can view and modify it
Delete - deletes the chosen file from the server and the uploaded listing
Uploading files to the server does not yet import their content to the system. After uploading the files, you can choose to either import the files now with the appropriate button OR to schedule the uploaded files to be imported at an appropriate time.
Below the listing, there are three buttons visible:
- Import now
Imports the uploaded files and saves all found securities, transactions, market prices, contacts and portfolios (based on the type of the files imported). The import function also reports any errors found in the file import.
- Download not processed
Downloads the CSV files to your computer, when you can view and modify them.
- Delete not processed
Deletes all, not processed file uploaded to the server.
After pressing the Import now button - or after the scheduled import has gone through - the imported files together with the error files are listed in the window, in the listing visible.
- Imported files: x, Error files: x
The files imported to the system can be seen on the right, listed with the name of the file and the status of the import. The heading of the listing shows the number of imported files and the number of error files (for example, Imported files: 1, Error files: 1 indicates, that one file has been imported correctly, and one file containing all the errors has been created). The listing shows all the files imported, which were uploaded to the server and processed either with the Import now button or with the scheduled automatic import. You can perform functions to the files with a right-click of your mouse:
Open - downloads the chosen CSV file to your computer, when you can view and modify it.
Delete - deletes the chosen file from the imported listing.
The processed files are named according to successful imports and errors in importing the files.
When importing FA Format files, each row in the import or error files represents one object imported (one new transaction, one new market price, one new security etc.): these rows are divided into imports and errors, each to their own file. The files are named in the following way:
Successful imports: filename-imported-yyyymmddxxxxxx.csv (for example marketprices-imported-20111101111220.csv) includes the successfully imported lines from the original CSV file.
Error files: filename-errors-yyyymmddxxxxxx.csv (for example marketprices-errors-20111101111220.csv) includes the lines with errors during the import from the original CSV file
Below the listing, there are three buttons:
- Download all
Downloads the processed files to your computer for you to view.
- Download errors
Downloads all the error files to your computer for you to view.
- Delete all
Deletes all processed files, both imported and error files.
The Scheduled automatic import is defined in the field at the bottom of the window. Automatic processing can be scheduled on files uploaded to the server with the Upload button at the upper-left corner of the window, and are visible in the Files listing.
There are two field visible:
- Time
Define the time of the scheduled automatic import to the first field in a form hh:mm, for example 01:00. If only the time is defined without the date, the scheduled automatic import is starts every day at the defined time.
- Date
Choose the date of the scheduled automatic import to the second field. If only the date is defined without the time, the scheduled automatic import starts as the day changes at 00:00.
The Schedule button next to the fields saves the set time to be the start time of the automatic import - the files uploaded to the server will start to be processed at the set time.