Steps to set up contract preferences
Contracts provides you with an easy and efficient way for entering contract-type investments, such as FX contracts, into FA. Saving your contract saves it within your transactions, but also produces relevant positions into your portfolio and generates relevant cashflows for the end of the contract. Due to this, you need to configure certain preferences to start using contracts.
Step 1 - Create transaction types
First, set up relevant transaction types that are used to save the contract within your transactions, generate forward cashflow positions into your portfolio in the beginning of the contract, and generate relevant cashflows at the end of the contract. You can set these up in Transaction type Preferences.
Configure a transaction type that is used for saving the contract into your portfolio. You need one transaction type for "Add contract". For more specifics, see Transaction types for contracts.
Configure transaction types that are used for opening the forward cashflow positions into your portfolio in the beginning of the contract. You need separate transaction types for "Forward cashflow in" and "Forward cashflow out". For more specifics, see Transaction types for contracts.
Configure transaction types that are used for saving the cashflows generated at the end of the contract. You need separate transaction types for "Cashflow in" and "Cashflow out". For more specifics, see Transaction types for contracts.For more specifics, see
Step 2 - Create security types and link transaction types to security types
Second, set up relevant security types that are used for creating the contract security and forward cashflow securities, and link the transaction types you created in step 1 to relevant security types. You can set these up in Security type Preferences:
Configure a security type that is used for creating the contract security for the contract. You can otherwise use any security type name, but you should use the base type CONTRACT. For more specifics, see Security types for contracts.
Link the "Add contract" transaction type you created in step 1.1 to your new contract security type you created in step 2.1
Configure a security type that is used for creating forward cashflow securities for the contract's forward cashflows. You can otherwise use any security type name, but you should use the base type DISCOUNT. For more specifics, see Security types for contracts.
Link the "Forward cashflow in", "Forward cashflow out", "Cashflow in" and "Cashflow out" transaction types you created in steps 1.2 and 1.3 to your new forward cashflow security type you created in step 2.3. If you miss this step, your (forward) cashflow transactions are shown without a transaction type when you open them!
Step 3 - Configure contract types
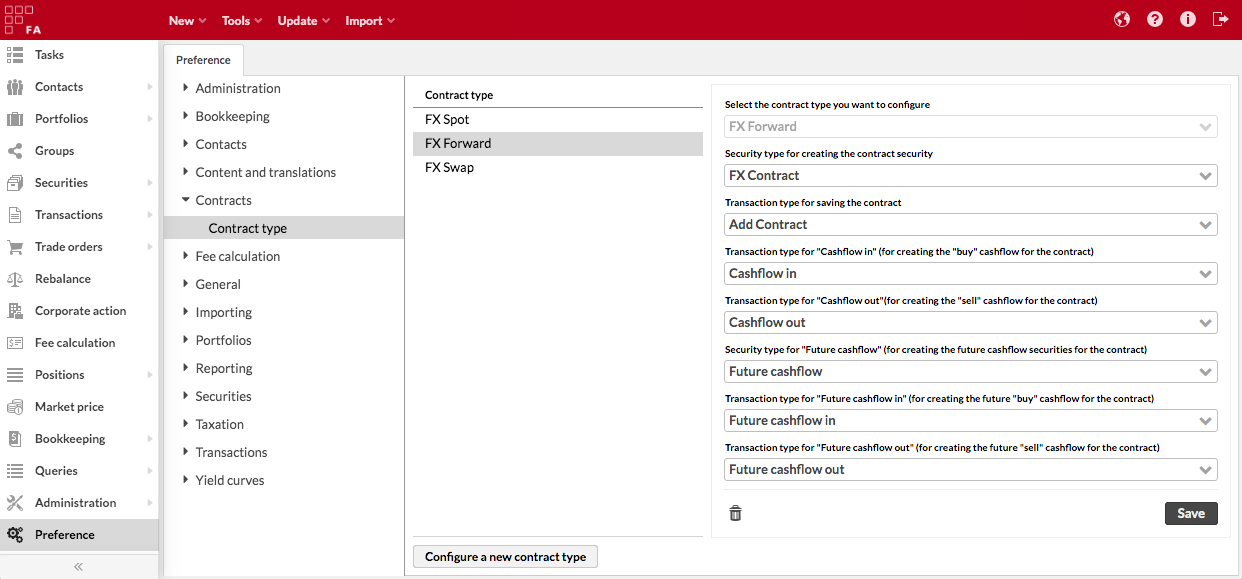
Third, once you have relevant transaction types and security types in place, you can configure your contract types in Contract types Preferences. You need to separately configure each contract type you want to use by associating the transaction types and security types you created in step 1 and 2 to each contract type.
Configure a new contract type to start setting up the configurations. You can configure each supported contract type only once - if the list is empty when configuring a new contract type, you have already configured all supported contract types!
The available configurations vary a bit based on the contract type you selected. Each contract type results in a different number of items created when saving the contract - you can associate the following security types and transaction types to your contracts:
Security type (e.g. "FX contract") and a transaction type (e.g. "Add contract") used to save the contract.
Separate transaction types (e.g. "Cashflow in" and "Cashflow out") for "buy" and "sell" cashflows generated at the end of the contract.
Security type (e.g. "Forward cashflow") and separate transaction types (e.g. "Forward cashflow in" and "Forward cashflow out") for "buy" and "sell" forward cashflows opened in the beginning of the contract.
Step 4 - Decide on additional contract preferences
Fourth, there are additional Contract preferences you should make a decision about (available from FA 3.7 onward). These preferences are not mandatory to change, but in order for your contracts to be created according to your liking, you should make a decision on these in the beginning. Also, changing these settings later on will not have an effect on the contracts you have already saved.
Step 5 - Configure yield curves for valuating your forward cashflows
For the system to be able to valuate the forward cashflow positions generated for your FX contracts, you need to configure appropriate discount curves in Yield curve Preferences. You need to have appropriate yield curves for all currencies involved in your FX contracts, and the yield curves are used to calculate the discount factors for each forward cashflow until maturity, and the discount factors are then used to calculate the net present value of your forward cashflows.
For more details, see Steps to set up yield curves for valuating forward cashflows for valuating forward cashflows. Find below an overview of the required steps:
Set up the interest rates (e.g. LIBOR EUR 1W, 1M, 2M, 3M, 6M and 12M) you want to use as points in your yield curve. You need at least two interest rates with different maturities for interpolation to work between them. Set up your interest rates as securities in the system (i.e. one security for each interest rate with different maturity). Set the tenor for you interest rate, and multipliers 100 and 100 if you are receiving your market data as "percentage rates" (i.e. market date entry 2,73 means interest rate 2,73 %).
Set up yield curves (e.g. LIBOR EUR DISCOUNT) out of the interest rates you defined in step 1. You should set up a yield curve for each currency involved in you FX contracts. Set up your yield curves under the Yield curves preferences (i.e. one curve for each currency). Link your interest rates to your yield curve as securities, and select value type ZeroRate if your interest rate securities get their market data as interest rates.
Create curve groups out of the yield curves you defined in step 2. Curve groups allow you to indicate which curve should be used to discount which currency.
Step 6 - Enable permissions for managing contracts
Enable permissions for managing contracts. Per each user role, you can separately define whether they have the permission to only view, modify and create, or delete contracts. In addition, you can separately control which users can import contracts.
Once your permissions are in place, your users can start entering contracts into the system.