Set up direct debit payments
Before starting to configure Direct Debit payments, make sure to familiarize yourself with the Direct Debit payments.
Direct debit payment and mandate files are based on certain fixed values (details about the sender) and some changing values (transaction and contact details). To start using direct debit payments and mandates, first configure the fixed values.
Note
To use this functionality, you should have role PAY_DD.
Prerequisites
To use direct debit payments, you need a cash management agreement with your bank that includes direct debit payments.
Configure direct debit payments
Go to Tools → Administer → Bank and custody connections → Manage, Direct debit payments tab.
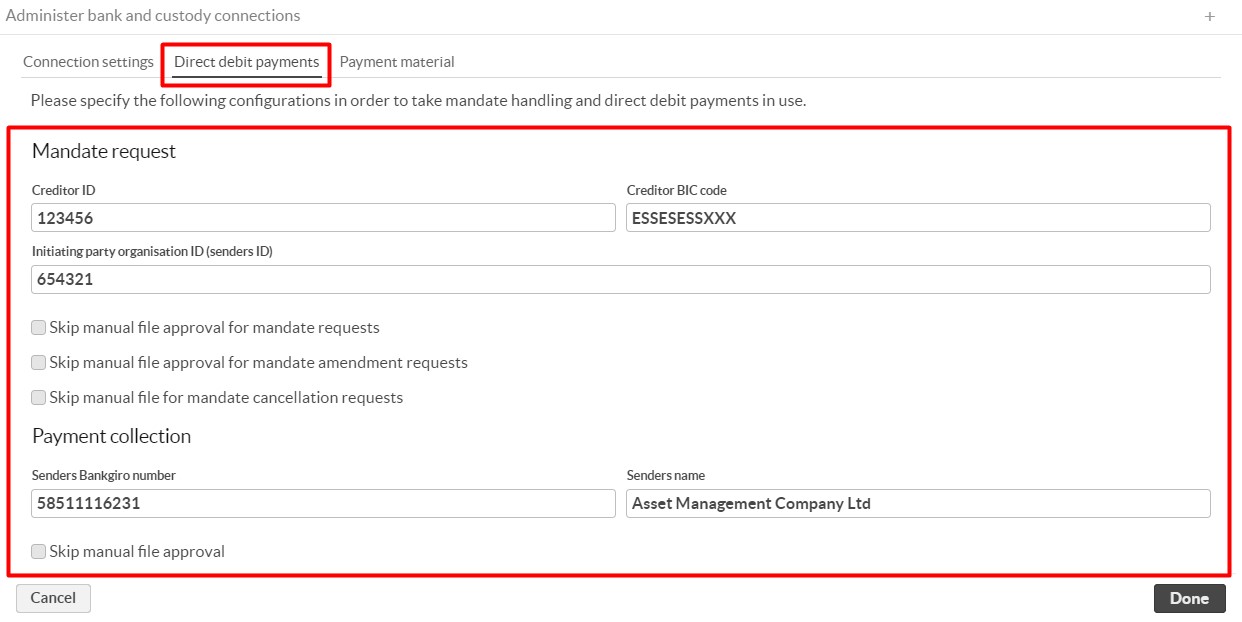 |
Enter the details about your company:
Creditor ID, Agreement ID/number. Normally recieved from the bank used for handling your Direct Debit payments (e.g. SEB).
Creditor BIC code, BIC code for the bank used for handling your Direct Debit payments.
Initiating party organisation ID (senders ID), Your company's organisation number.
Senders Bankgiro number, Your company´s Bankgiro number that is linked to Direct Debit payments.
Senders name, name of your company.
Skip manual file approval for mandate requests, if checked, user will not be prompted with a pop-up window when generating mandate request files where files can be downloaded and checked before sending. If user would like to automate the file transfer to bank, this should be checked.
Skip manual file approval for mandate amendment requests, if checked, user will not be prompted with a pop-up window when generating mandate amendment request files where files can be downloaded and checked before sending. If user would like to automate the file transfer to bank, this should be checked.
Skip manual file approval for mandate cancellation requests, if checked, user will not be prompted with a pop-up window when generating mandate cancellation request files where files can be downloaded and checked before sending. If user would like to automate the file transfer to bank, this should be checked.
Skip manual file approval, if checked, user will not be prompted with a pop-up window when generating payment collection files where files can be downloaded and checked before sending. If user would like to automate the file transfer to bank, this should be checked.
Note
If you want to automate the file transfer to and from the bank, check Bank and custody connections.
Automate file transfer
To use automatic file transfers to and from the bank, start by configuring the connection settings to one of the supported banks, as explained in Bank and custody connections.
Automatically generate mandate reference for accounts used with direct debit
To use direct debit payments, the accounts that are enrolled must have a unique mandate reference. This is a field on the portfolio's account that you can fill in manually from the Portfolio window, import or have automatically generated when you define an account to be used with direct debit.
To automate the reference number generation, upload the decision table below to FA (to learn more about decision tables, see Business rules in FA Developer guide). The decision table is set up so that if you add the Generate mandate reference tag to a portfolio that has accounts waiting to be enrolled in direct debit (that is accounts with a tag Mandate-Waiting), those accounts get a unique mandate reference generated into the Mandate reference field. See Mandates in FA User Guide for more details about how to handle direct debit mandates.
To upload the decision table:
Download the fa_portfolio_setAccountMandateReference.xlsx spreadsheet.
Go to Tools → Administer → Decision tables in FA Back and upload the spreadsheet to FA.
Click Reload rules from Document bank.
When you complete these steps, the business rules in the decision table become active.