Create dynamic documents
The Dynamic documents process allows you to prefill PDF, RTF and XLS(X) document templates with the selected customer's information. Using the process allows you to create templates outside of FA, upload these templates to be filled in with data from FA, and to use the process to fill in the template with selected customer's data.
This process also supports documenting the generation of documents from customer data: the process can be configured to create a "Done" task linked to the customer indicating that a document was filled with the customer's information, and to save the filled in document under the customer's documents.
Steps to fill in dynamic documents
Follow the steps below to create dynamic documents with contact information:
Step 1 - Create the document templates you want to dynamically fill in.
The process supports filling in document templates with the information fetched from a selected customer. The document templates and the keys available for fetching the contact information can be managed through launching the Dynamic documents process - open a customer in the system and click "CRM: Dynamic documents" button under the "Processes" section in the customer information to be able to manage the document templates.
The document templates to be filled in are constructed through the following steps:
Create a document template in PDF, RTF, XLS or XLSX format. Your document template can contain any kind of information and formatting as long as it is saved in one of the supported file formats.
In order to fill in customer information from FA to your document template, you need to use specific keys and syntax for the system to recognize what information to fill in and where. To fill in customer information, use the keys available under the Keys tab (available when launching the Dynamic documents process). The keys listed in the Keys tab also provide you with the values you would get with each key for the customer you launched the process for.
For PDF: To embed a key into your template, add it as the name of a text field with syntax "key". For example, if you want to fill in your customer's name into your document template, use "contact.name" in your document as the name of the text field you want to add the customer's name to. You need a proper PDF editor, such as Adobe Acrobat, to build dynamic PDFs.
For RTF, XLS and XLSX: To embed a key into your template, wrap it around two percentage signs with syntax "%%key%%". For example, if you want to fill in your customer's name into your document template, write "%%contact.name%%" in your document in the place you want to add the customer's name to. Find also attached a simple example Excel template, that fetches basic customer information to the document.
Once your document template is done, upload the document template to FA under the Upload tab (available when launching the Dynamic documents process). Once uploaded to the system, your document template will appear in the Templates tab and is available to be filled in with customer information.

Step 2 - Start the process to fill in the template for the selected contact.
After you have created the document templates you want to use and uploaded these into the system, you can dynamically fill in you document templates through the following steps:
Search for a customer on the Customers view and double-click to open the customer information on the Customers view. You can also open the customer information in the Contact window.
Under the Processes section for the customer on the Customers view, click "Dynamic documents" (or however the process has been configured to show) to start the process of dynamically filling in a document template with the information saved for the opened customer in FA. You can fill in one document at a time per one customer at a time. If you are filling in PDFs, you have an option to "Lock PDF fields".
Select the document template you want to fill in from the Templates tab available in the dynamic documents process and click Generate document in the bottom right-hand corner of the window.
Step 3 - Download the filled in document.
After initiating the creation of the document, the system will go through the selected template, search for valid keys entered with the correct syntax, and replace the "%%key%%"s found with the values out of the information of your selected customer. After the document is filled in:
The process prompts you to download the generated document. The filled in document template is provided to you as an attachment in the last window of the process. Use the download icon to download the document filled in with your customers data. Once you have retrieved your document, click "Done".
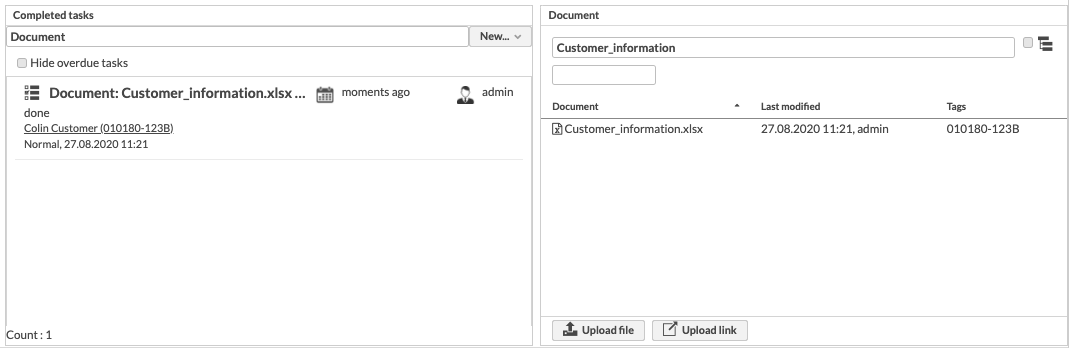
After clicking "Done", if you have configured so (see process configurations below), the process can automatically create a done task to document that a document was filled in to the customer with the customer's information. The task contains the name of the filled in document, the date the document was filled in and as the assignee the user who initiated the process to fill in the document.
After clicking "Done", if you have configured so (see process configurations below), the document the process filled in can be automatically saved under the customer's documents. Thus, the filled in document can be found from the Documents section of the customer information, and the filled-in document can be retrieved later for further use.
Prerequisites and configurations
The dynamic document process has some configurations you can set in the Administration view:
Template folder name - Define the folder in which you have stored the document templates to be used. You can set up a new folder for your dynamic templates through Administration view's document management. This configuration is mandatory for the process to know where to fetch (and store) the dynamic templates you want to fill in.
Create done task - enable, if you want to store a done task linked to a customer every time a dynamic document is filled in with the customer's information.
Save documents - enable, if you want to store the generated documents under the customer's document folder.
Name of the deployment mapping file (optional) - name of the file that can contain customer-specific logic, for example to create available values.
Name of customer specific mapping script (optional) - name of the script that can contain customer-specific logic, for example for naming the generated files.