Contact window
The Contact window allows you to create a new contact or to view and edit the information of existing contacts. You can create a new contact through the menu in New - New contact, and you can view the information of existing contacts by double-clicking a contact either from your search result on the Contacts view or from the Overview.
You can define the basic information of the contact in the first tab, and use the other tabs to define additional information for the contact. In the Basic info tab, the contact type determines the role of the contact in the system: a contact can be for example a customer, when portfolios can be added to the contact, or an asset manager. To switch between the tabs, click on them or use the  icon at the bottom of the window.
The Basic info tab allows you to define the basic information of the contact, such as ID and name. A red star indicates that a field is mandatory.
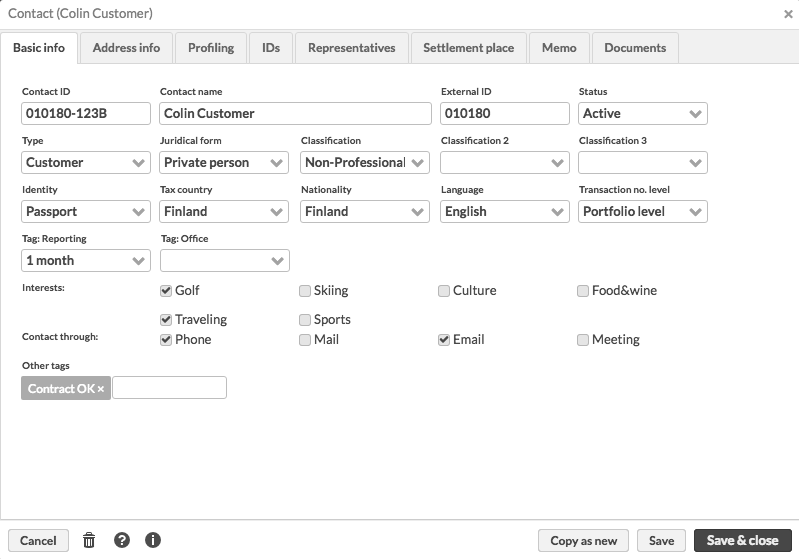 |
The following fields are available (fields marked with * are required):
Title. Contact's title. This field is only available if titles are defined. You can define available titles in Preference - Contacts.
First name. Contact's first name.
Middle name. Contact's middle name(s).
Last name. Contact's last name.
Contact ID*. An individual ID defined for a contact – an internal customer ID or a sequential number from the CRM system. The contact ID separates a contact from other contacts (the system does not allow more than one contact with the same contact ID). The contact ID is used in search and import functions. Best practice is not to include special characters into the contact ID - only use numbers and letters (a-z). Contact ID can be shown in various listings, for naming reports and document directories. Do not enter the confidential information, such as the client's social security number, in this field.
Contact name*. Name of the contact. Avoid the ">" character in the beginning of the contact's name - this will confuse the contact as a group when selected on the Overview. For private persons, you can define the contact name in this field if you don't want to define the name fields separately. The system uses the first name and last name fields to fill in this field if you define them separately.
External ID. External ID for identifying a contact, for example, identity number or social security number. External IDs are used, for example, for authority reporting and for PEP and sanctions checks.
Status*. Status of the contact: "Active", "Passive", or "Closed". The status allows you to categorize contacts. The recommended status to use for contacts you actively work with is "Active", because contacts with this status are shown everywhere in the system and can be worked with in the Overview. "Passive" and "Closed" contacts are not selectable in the Overview (to avoid cluttering the list of contacts you are actively maintaining), but you can still access contacts regardless of their status through the search views.
Close date. The date when the contact was marked as closed. The field is useful for data retention management and GDPR compliance.
Deceased. Indicates if the contact (private person) is deceased.
Date of death. The date of death if the contact is deceased.
Type*. Choose the contact type from the alternatives, which are defined in Preferences - Contact types. The contact type affects the functions you can perform on a contact: for example, portfolios can be added only to contacts of the type Customer, and only contacts of the type Asset manager can be added as asset managers.
Juridical form*. Choose the juridical form from the alternatives, which are defined in Preferences - Juridical form. The juridical form of a contact affects the juridical form of a portfolio added to the contact: the default juridical form of a portfolio is the juridical form of the contact of the portfolio. However, the changing of the juridical form of the contact doesn't affect the juridical forms of the existing portfolios assigned to the contact. The juridical form affects the taxation of certain transactions added to the portfolios: when creating corporate actions, the tax associated with these is defined as a combination of juridical forms and tax countries of the portfolio.
Classification* . Choose the classification from the alternatives, which are defined in Preferences - Classification.
Classification 2 and 3 . Choose the classification from the alternatives, which are defined in Preferences - Classification.
Issuer group. The issuer group – another issuer contact in the system that serves as a company group. Define the issuer group for the contact to view the Analytics+ figures by issuer group. The field is available only for contacts of the issuer type.
Identity*. Choose the identity from the alternatives, which are defined in Preferences - Identity.
Tax country*. Choose the tax country from the alternatives, which are defined in Preferences - Countries. The tax country of a contact affects the tax country of a portfolio added to the contact: the default tax country of a portfolio is the tax country of the contact of the portfolio. However, the changing of the tax country of the contact doesn't affect the tax countries of the existing portfolios assigned to the contact.
Nationality. Choose the nationality from the alternatives, which are defined in Preferences - Countries.
Language. Choose the language to be used in portfolio reports from the alternatives, which are defined in Preferences - Language. The language of a contact affects the language of a portfolio added to the contact: the default language of a portfolio is the language of the contact of the portfolio. However, the changing of the language of the contact doesn't affect the languages of the existing portfolios assigned to the contact. The language chosen for a contact determines, which language is used in the portfolio reports when creating a report: the reports are created in the language of the portfolio. The translations for the security and transaction types to different languages are defined in Preferences - Internationalization. If no language is selected, the reports are printed out in Finnish and the abbreviations defined for security and transaction types are used.
Transaction no. level. Choose from:
Portfolio level - the system automatically generates a transaction number for a transaction, which is individual to each transaction within the portfolio.
Contact level - the system automatically generates a transaction number for a transaction, which is individual to each transaction within all the portfolios of the contact.
Date of birth. Contact's date of birth.
Tags. Choose tags from the alternatives defined in Preferences - General - Tags. Tags can be defined in three different ways:
Grouped tags (select one): you can select one tag from each tag group, grouped in separate drop downs. Only one tag in each tag group can be chosen. To group tags in a drop down, defined them with a hyphen as "group - tag", for example Reporting - 1m or Office - Helsinki.
Grouped tags (select multiple): you can select multiple tags from each tag group, grouped as separate sets of check boxes. You can check multiple tags within each tag group. To group tags as a set of check boxes, defined them with a colon as "group : tag", for example Hobbies : Golf and Hobbies : Food&Wine.
Individual tags: search for individual tags by typing the tag in the field and choosing the correct tag from the list below the field - all available tags are show from the downward arrow on the keyboard. You can select multiple individual tags.
In the Address info tab, you can add or export the contact's address information. You can simultaneously maintain multiple different addresses, for example "home address", "office address", and "primary address".
Use the Add address button to add a new address, and define the address information in the available fields (fields marked with * are required):
Name* - address name
Address 1
Address 2
Zip code
City
Country
Email - email address
Phone - phone number
Fax - fax number
Permission to use electronic communication - option to allow electronic communication such as sending emails to the contact
Permission to send marketing materials - option to allow sending marketing materials to the contact
Use the Export button to export all of the contact's addresses ("All addresses") or only one address ("Selected address") as a CSV file.
The Taxation tab allows you to define the contact's tax information.
Tax country –The contact's tax country. You can edit the tax country in the Basic info tab.
Taxation number – The contact's taxation number, for example, the National Insurance number in the UK.
CGT profile – The CGT profile linked to the contact for capital gains tax calculation.
The IDs tab allows you to define external IDs for your contact. These IDs are used by other parties to identify the contact, and can be used for example to store LEI codes, CIF numbers or any other external Customer IDs.
Add a new ID with the Add ID button, and define the ID information in the available fields (fields marked with * are required):
External name* - the name of the ID (or who uses the ID, where is it from). When starting to type in an ID, the system automatically suggests ID names you have used previously.
External ID* - the external ID for the contact.
The Representatives tab allows you to define representatives who can access the client’s portfolios and contact information. A representative is a user who manages and is responsible for the contact, or who otherwise represents the contact - for example, an advisor can represent their clients, or a private person can represent their company or children.
To add a representative, click Add representative and choose the representative's contact from the drop-down menu. If you have representative tags set up in preferences (see Preference - Tags), you can use them to specify the representative's role for information purposes (for example, parent, company owner, and so on).
To learn more about linking a representative to contact, see Set up limited visibility for one user and Set up limited visibility for many users.
The Settlement place tab allows you add settlement places defined in settlement place preferences as the contact's settlement place ( for more information, see Preference - Securities). Settlement places are for example defined to "Counter party" contacts when generating SWIFT messages from the system to settle trades - settlement place is then used to select the settlement place / exchange the counter party operates in and to define the account information of the counter party in the exchange.
Add a new settlement place with the Add settlement place button, and define the settlement place information in the available fields. The required information depends on the requirements from the settlement place and what you are using the settlement place information for.
Settlement place - select the settlement place you want to add, i.e. select the settlement place your want to settle trades with this counter party.
Name - shows the name of the selected settlement place.
Code - shows the code of the selected settlement place.
Define the account information of the contact within the selected settlement place:
Counter - define the counter information, usually as a BIC code.
Agent - define the agent information, usually as a BIC code.
Account - define the account information.
The Key figures tab allows you to manually record values for different contact indicators. For example, you can store contact tax values or fee percentages that change over time. See Preference - Content and translations for details about how to add key figures.
Memo allows you to write optional information, notes or observations related to the contact. The contents of the memo are also shown in the Memo section on the Overview, when the contact is selected.
You can also import texts to the memo from a file through Import - Import contact memo, or to edit the contents of the memo directly from the Memo section on the Overview.
Documents allows you to manage documents related to your contact. For more information, see Manage documents in FA User guide.
The Processes tab allows you to run processes for your contacts, if contact-related processes have been defined for you in FA.
Saving a contact saves the contact into the system, and after you save the contact, you can for example create portfolios to it. When editing the information of an existing contact, the system just updates the contact information - the updated information is picked up by the system automatically.
At the bottom of the Contact window, you can:
Save and close - saves the contact / the changes made to the contact information and closes the window.
Save - saves the changes made to the contact information, and takes you back to the Basic info tab.
Copy as new - copies all of the existing contact's information as a base for you to create a new contact with a new ID. This function copies all other contact information except for the Contact ID, since this information is contact-specific and related to only one single contact.