Preference - Securities
Security preferences allow you to set the options available in the fields when defining the basic information of a security in the Basic info tab on the Security window. This allows you to flexibly group and categorize your securities.
Asset classes and types
Asset classes and types can be defined in the Asset classes and Asset types window in Preference. You can define:
Asset groups on the highest level. An asset group is a set of asset classes and types. For example, geographical allocations or industry-based allocations.
Asset classes on the middle level. The asset classes represent the higher-level classifications within an asset group. For example, "002 Africa" class in the standard geographical allocation group.
Asset types for the asset classes on the lower level. For example, "012 Algeria" as an asset type in the "002 Africa" asset class.
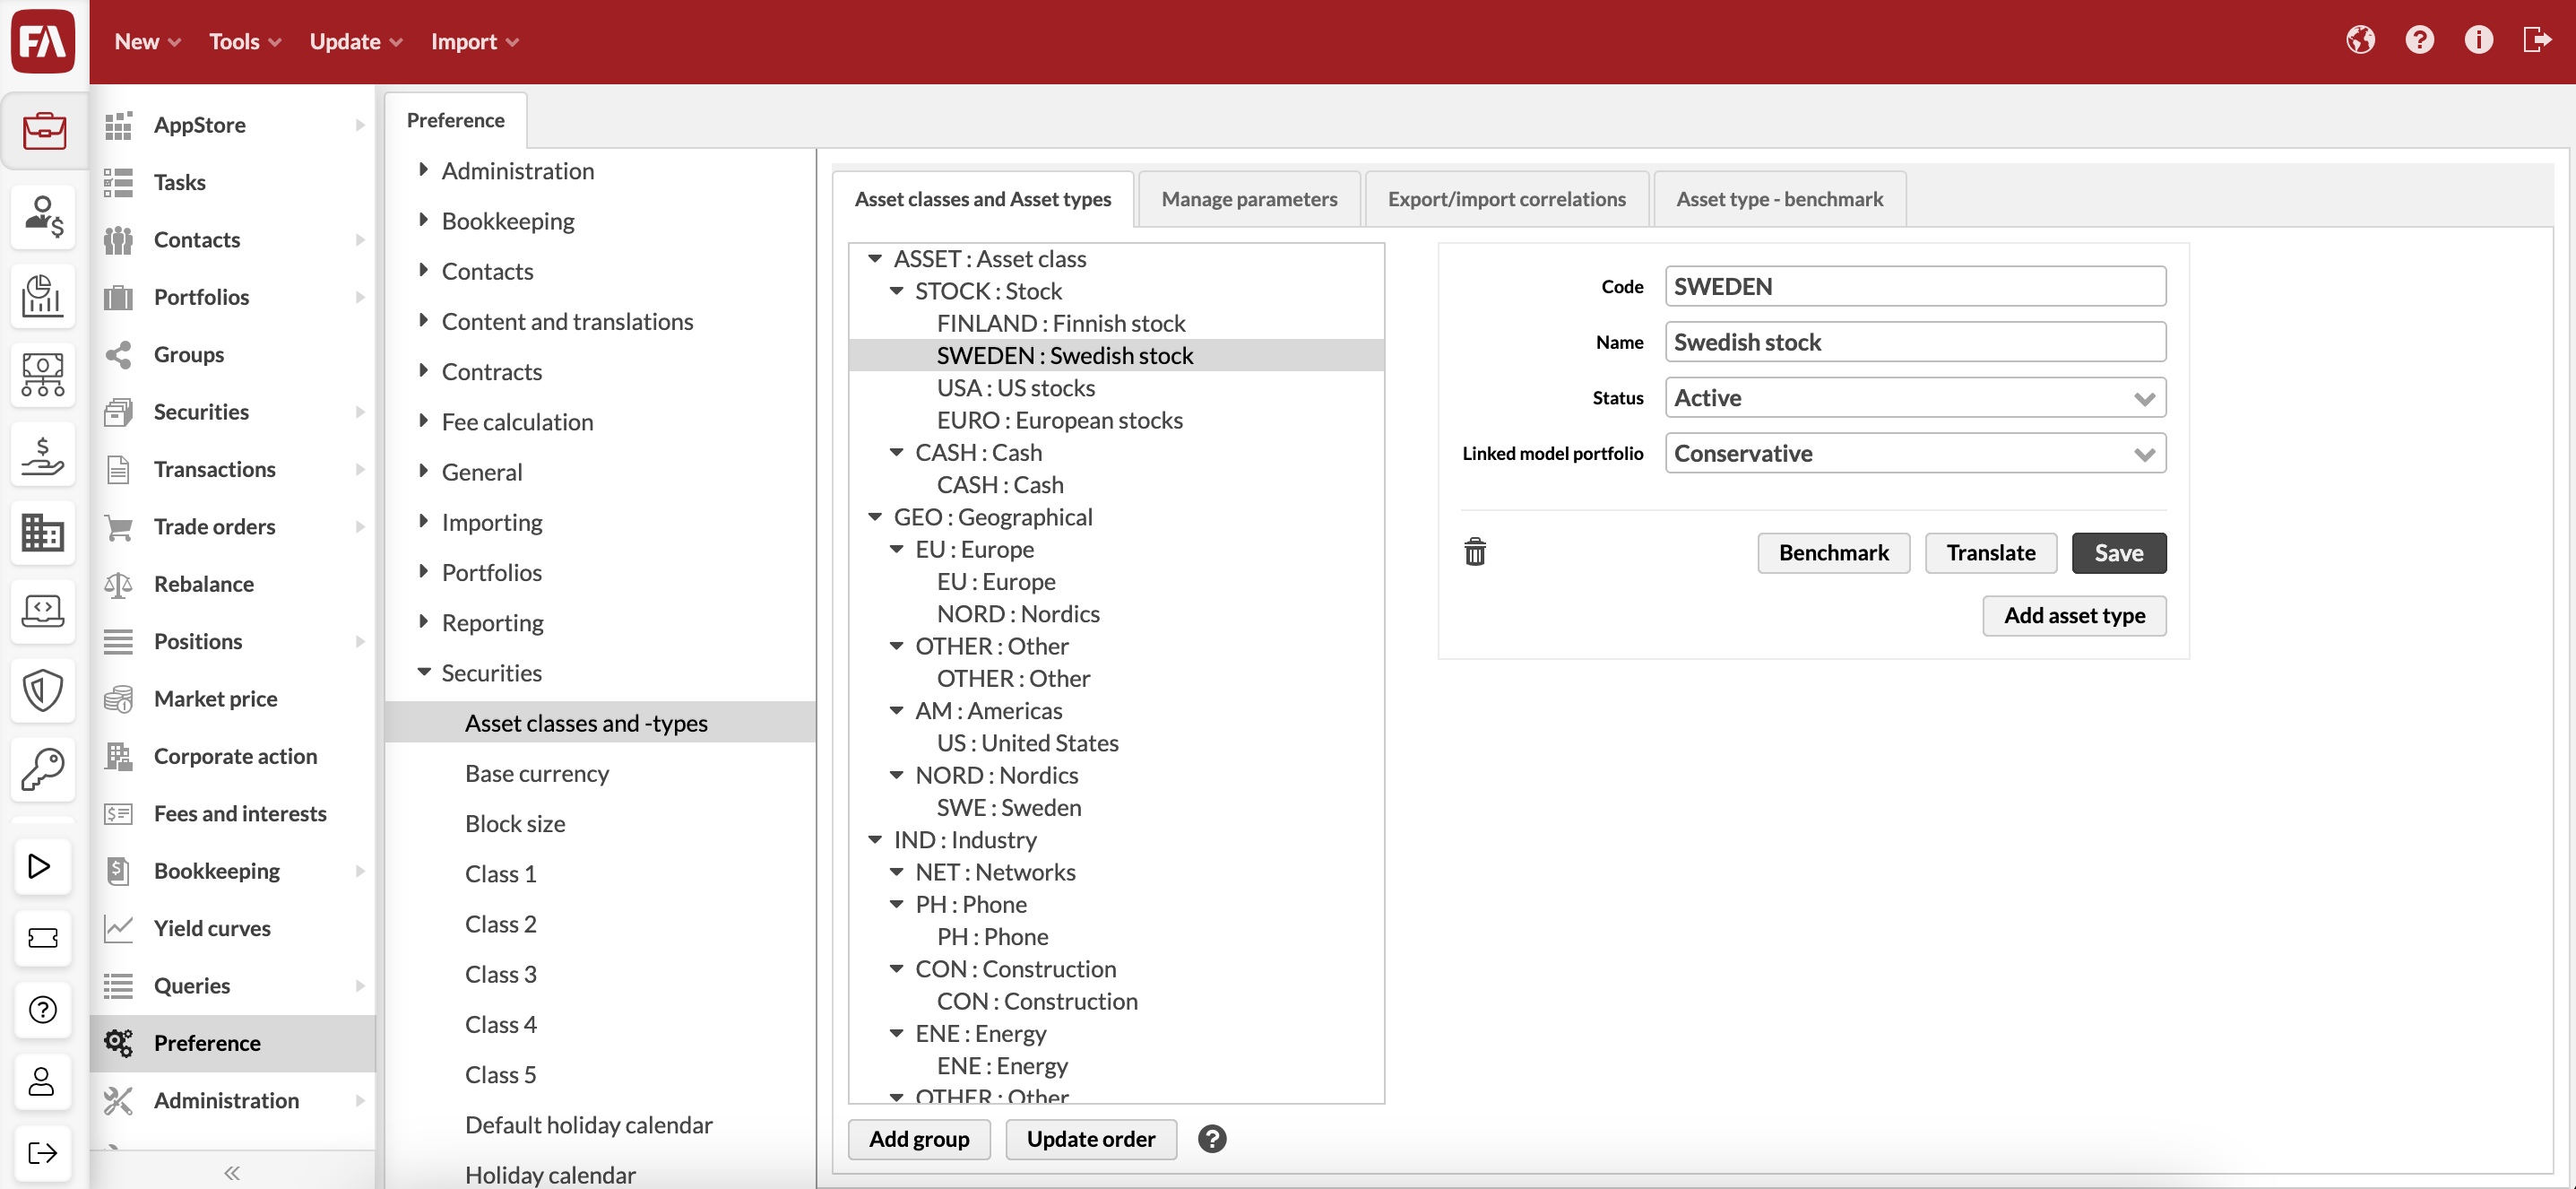 |
The order of the asset classes and types in the list is used for example to show them in reports. You can modify the order of the asset groups, classes, and types by dragging them to the preferred position in the listing. You can also move asset types from one asset class to another. To confirm the changes, click Update order.
A new asset group, asset class, or asset type is added with the Add group, Add asset class , or Add asset type button. You need to define the following properties:
- Code
The code is used to identify the asset group, class or type in the system.
- Name
The name is used to view and choose the asset group, class or type in the user interface and reports.
- Status
(Only for an asset type) The status is used to determine if the type is available for securities (choose between Active and Passive).
- Linked model portfolio
(Only for an asset type) A model portfolio linked to the asset type. This allows you to define the asset type content and use it for setting up a strategy. For details, see the Strategy tab description.
Manage parameters
In the Manage parameters tab, you can manage and modify the parameters, such as the volatility and expected return, for the saved asset types. The parameters can only be defined for asset types, not the main-level asset classes.
You can modify the parameters with the Edit button at the bottom of the window. The parameter information of asset types is divided into columns:
- Name
The asset type name.
- Volatility %
The volatility percent of the asset type.
- Expected return %
The expected return percent of the asset type.
The modified parameters can be saved with the Save button. The Cancel button closes the edit mode without saving.
Export/import correlations
In the Export/import correlations tab, you can modify the correlations between the asset types. Correlations are shown in the tab as a matrix, and the correlations can be modified with an Excel file. To modify the correlations, export the correlations to an Excel file with the Export button, make the necessary changes, and import the modified correlation file back to the system with the Upload file button.
There are three buttons visible:
- Export
Export - export the correlations as an Excel file to enable modification of the correlations
- Upload file
Import the modified correlation file back to the system to modify correlations
- Save
Save the changes made to the correlation matrix with the exported and imported file
Asset type - benchmark
The Asset type - benchmark tab can be accessed with the Benchmark button under each asset type. The tab allows you to create a benchmark for the asset type, similar to creating a benchmark for a portfolio.
Base currency
Base currency preferences allow you to define the base currency of the system.
You can select the system's base currency out of existing securities of the type CURRENCY - If your desired currency is not available, you can add it to the list by creating a new currency security. The system's base currency should usually be set according to the currency you are getting most of your FX rates against, and is usually the currency you are using most often in valuating your investments within your portfolios. For example, if most of your portfolios are in EUR, and you are getting most of your FX rates against EUR (EUR/USD, EUR/SEK, EUR/GBP etc.), then your systems base currency should be EUR.
The system's base currency is used to calculate FX rates for a currency cross that has not been set up in the system - the system can calculate such an FX rate through the base currency if relevant currency crosses have been defined against the base currency. For example, if the system's base currency is EUR and the system needs an FX rate USD/SEK, but it cannot find either USD/SEK or SEK/USD currency cross from the system, the system can calculate the USD/SEK FX rate through currency crosses defined against the base currency EUR, i.e. EUR/USD and EUR/SEK (or USD/EUR and SEK/EUR, respectively).
Block size
Block size preferences allow you to define the effect of the block size defined in the Security window.
Enable Block size affects multiplier / Block size affects multiplier 2 if you want the block size to affect multiplier or multiplier 2 in the Security window. If enabled, when you set a value in the Block size field, the multiplier(s) are automatically set accordingly. This setting helps you configure some types of securities, for example, index futures, more easily: you can only set the block size, which will then automatically adjust the multipliers accordingly. By default, neither of the options is selected, and setting a block size has no effect on multipliers.
Class (1 - 5)
In the Class preferences, you can define the classes available for securities. The classes are used to categorize securities, and the individual categorization systems are free of choice. The classification systems can be in any way useful to the user, and securities can be categorized with up to five different categorization systems. For example, you can categorize your securities with the level of risk in Class 1 (e.g. low risk / medium risk / high risk) and with the credit rating in Class 2.
Classes can be defined in the Class window in the Preference. A class consists of a code and a name: the code is used to identify the class in the system, and the name is used to view and choose the class in the user interface. Five classification systems are separate: for example, the values defined in Class 1 can only be chosen for the Class 1 field of the security.
Default holiday calendar
Default holiday calendar preferences allow you to set the default holiday calendar used when creating a new security. A holiday calendar for a security is used to distinguish business days from holidays and is used, for example, when setting a settlement date on a trade on the security.
Set the default holiday calendar by selecting it from the dropdown. The dropdown lists all available holiday calendars in the system - whichever holiday calendar you select is used as the default holiday calendar for any new security you create. By default, the default holiday calendar is set to "Saturday/Sunday weekends (SatSun)".
Holiday calendar
Holiday calendar preferences provide you with tools to configure holiday calendars, allowing you to flexibly accommodate different conventions in different markets. Holiday calendars distinguish between business days and holidays, and are used for example in accrued interest and coupon calculations for bonds and to determine settlement dates for transactions and trade orders.
Holiday calendar preferences allow you either to:
Customize the system's built-in holiday calendars by adding individual holiday dates.
This allows you to customize the system's built-in calendars when needed, for example in order to accommodate individual non-regular holidays on certain markets such as a king's funeral on a certain date.
Configure entirely new holiday calendars.
This allows you to build entirely new holiday calendars from scratch for a new market.
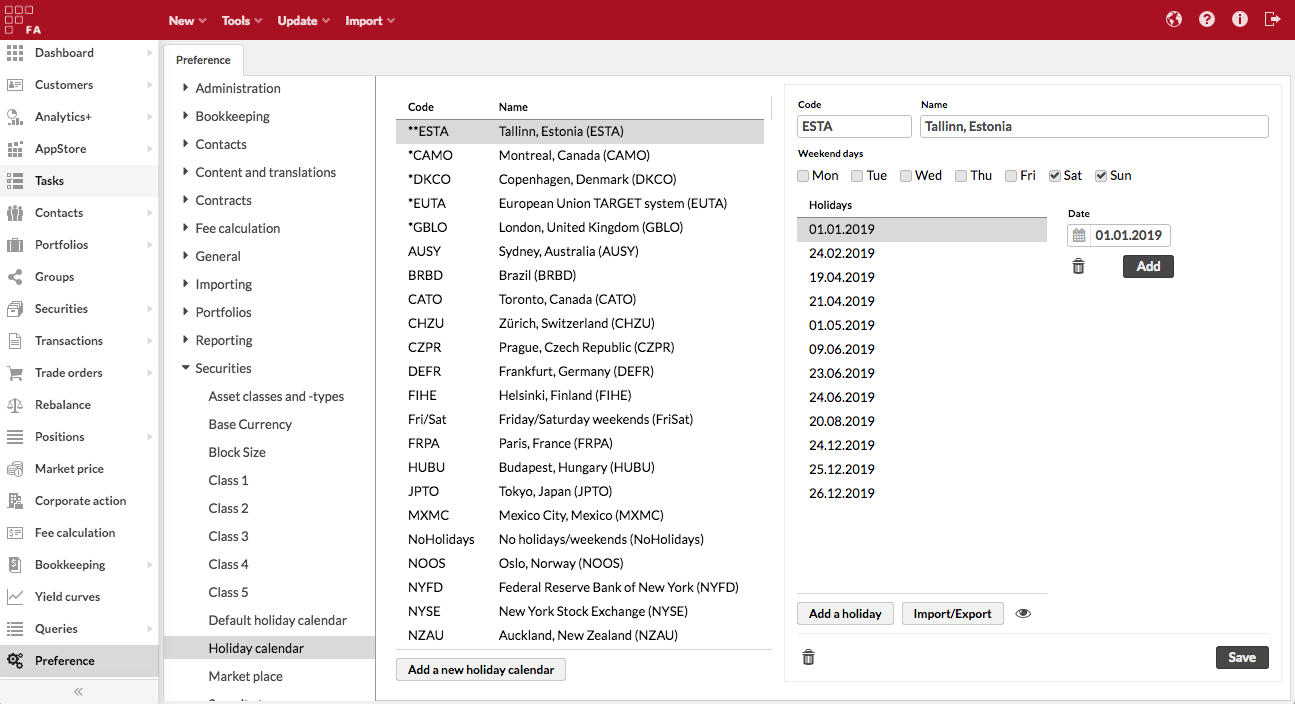
Existing holiday calendars are listed on the left. There are three different kinds of calendars you can configure, identified with stars (* or **) in front of the holiday calendar code allowing you to easily distinguish what kind of a calendar you are working with:
**CODE - entirely new holiday calendars. These calendars you can freely modify and delete since they have been configured from scratch. Once created, you can modify the calendar name, which days are weekend days, and which individual dates are considered as holidays.
*CODE - customized built-in holiday calendars. For these calendars, you can manage the custom holiday dates added to the built-in calendar, but cannot modify other parameters of the calendar. If you delete this kind of calendar, you in practice delete the custom dates you have added to the built-in holiday calendar and fall back to the original system's built-in holiday calendar you customized in the first place.
CODE - system's built-in holiday calendars. These calendars you cannot modify or delete, but you can make them customized built-in holiday calendars by adding holiday dates to them.
After selecting a holiday calendar from the list, you can manage the calendar through the following fields and buttons:
- Code
Unique holiday calendar code. Editable only for entirely new holiday calendars, the system's built-in calendars have fixed codes.
- Name
Name of the holiday calendar. Editable only for entirely new holiday calendars, the system's built-in calendars have fixed names.
- Weekend days
Allows you to tick which weekdays (options from Monday through Sunday) are considered as weekend days within your calendar. For example, if Saturdays and Sundays are weekend days within the market you are configuring the calendar from, ticking Sat and Sun will automatically mark all Saturdays and Sundays as holidays. This setting is only available for entirely new holiday calendars, the system's built-in holiday calendars already consider weekend days as holidays as relevant for each market.
- Add a holiday
Allows you to manually add a new holiday date to your holiday calendar. Define the holiday date in the available date field and add it with the Add button.
- Import/Export
Allows you to mass-modify the holiday dates within your holiday calendar all at once as text. You can for example easily copy-paste a list of holiday dates from somewhere else to add them to your holiday calendar. Import/Export allows you to enter holiday dates, each date on its own row with format dd.MM.yyyy - the date format corresponds with the date format configured for your user interface language, allowing you to view and add dates with the same date format as you see dates on the screen.
- Preview
The Preview icon allows you to easily preview the selected holiday calendar to check which days are marked as holidays (i.e. non-business days) within your calendar. Preview is available for all kinds of calendars, and allows you to see all dates that are considered as holidays. The calendar is by default opened for the current date, but you can navigate back and forward to any date either with the date selector on the top left or with the arrows above the calendar.
For entirely new calendars, the preview combines the weekend days you ticked and the holidays you added, and marks all as "Holidays".
For customized built-in holiday calendars, the preview combines the holiday dates from the underlying system's built-in holiday calendars and the holidays you have added manually, and marks all as "Holidays".
For the system's built-in holiday calendars, the preview shows the holiday dates from the system's built-in holiday calendars, and marks them as "Holidays".
Marketplace
In the Marketplace preferences, you can define the marketplaces available for securities, transactions, and exchanges that are available for contacts. The marketplace tells, where a security (or a transaction) is traded or in which exchanges a counter operates or a customer's custody lies. For example, the marketplaces can include markets where securities are traded or trades are executed, such as OMX or NASDAQ.
You can define Marketplaces in Preferences → Securities → Marketplace. A marketplace consists of a code and a name: the code is used to identify the marketplace in the system (if using for example SWIFT messages, define the valid MIC code for the marketplace), and the name (together with the MIC code) is used to view and choose the marketplace in the user interface.
You can define additional details to your marketplaces: these details include fields for Type, Country, MIC, and Operating MIC. These details can be used when sending out your trades. This information is also available as selectable columns on the Securities view, allowing you to easily see the details of the marketplace you have linked to your securities.
Security types
Security type preferences allow you to define the security types available for your securities. Security types are derived from a set of system-level "basic types", and define the characteristics of the securities of that type, how the securities of this type are managed in calculations, and what Transaction types are linked to this security type. For example, you can have multiple security types derived from the basic type FUND, such as "Mutual fund" and "ETF": both are derived from the same basic type FUND, but can otherwise have different characteristics.
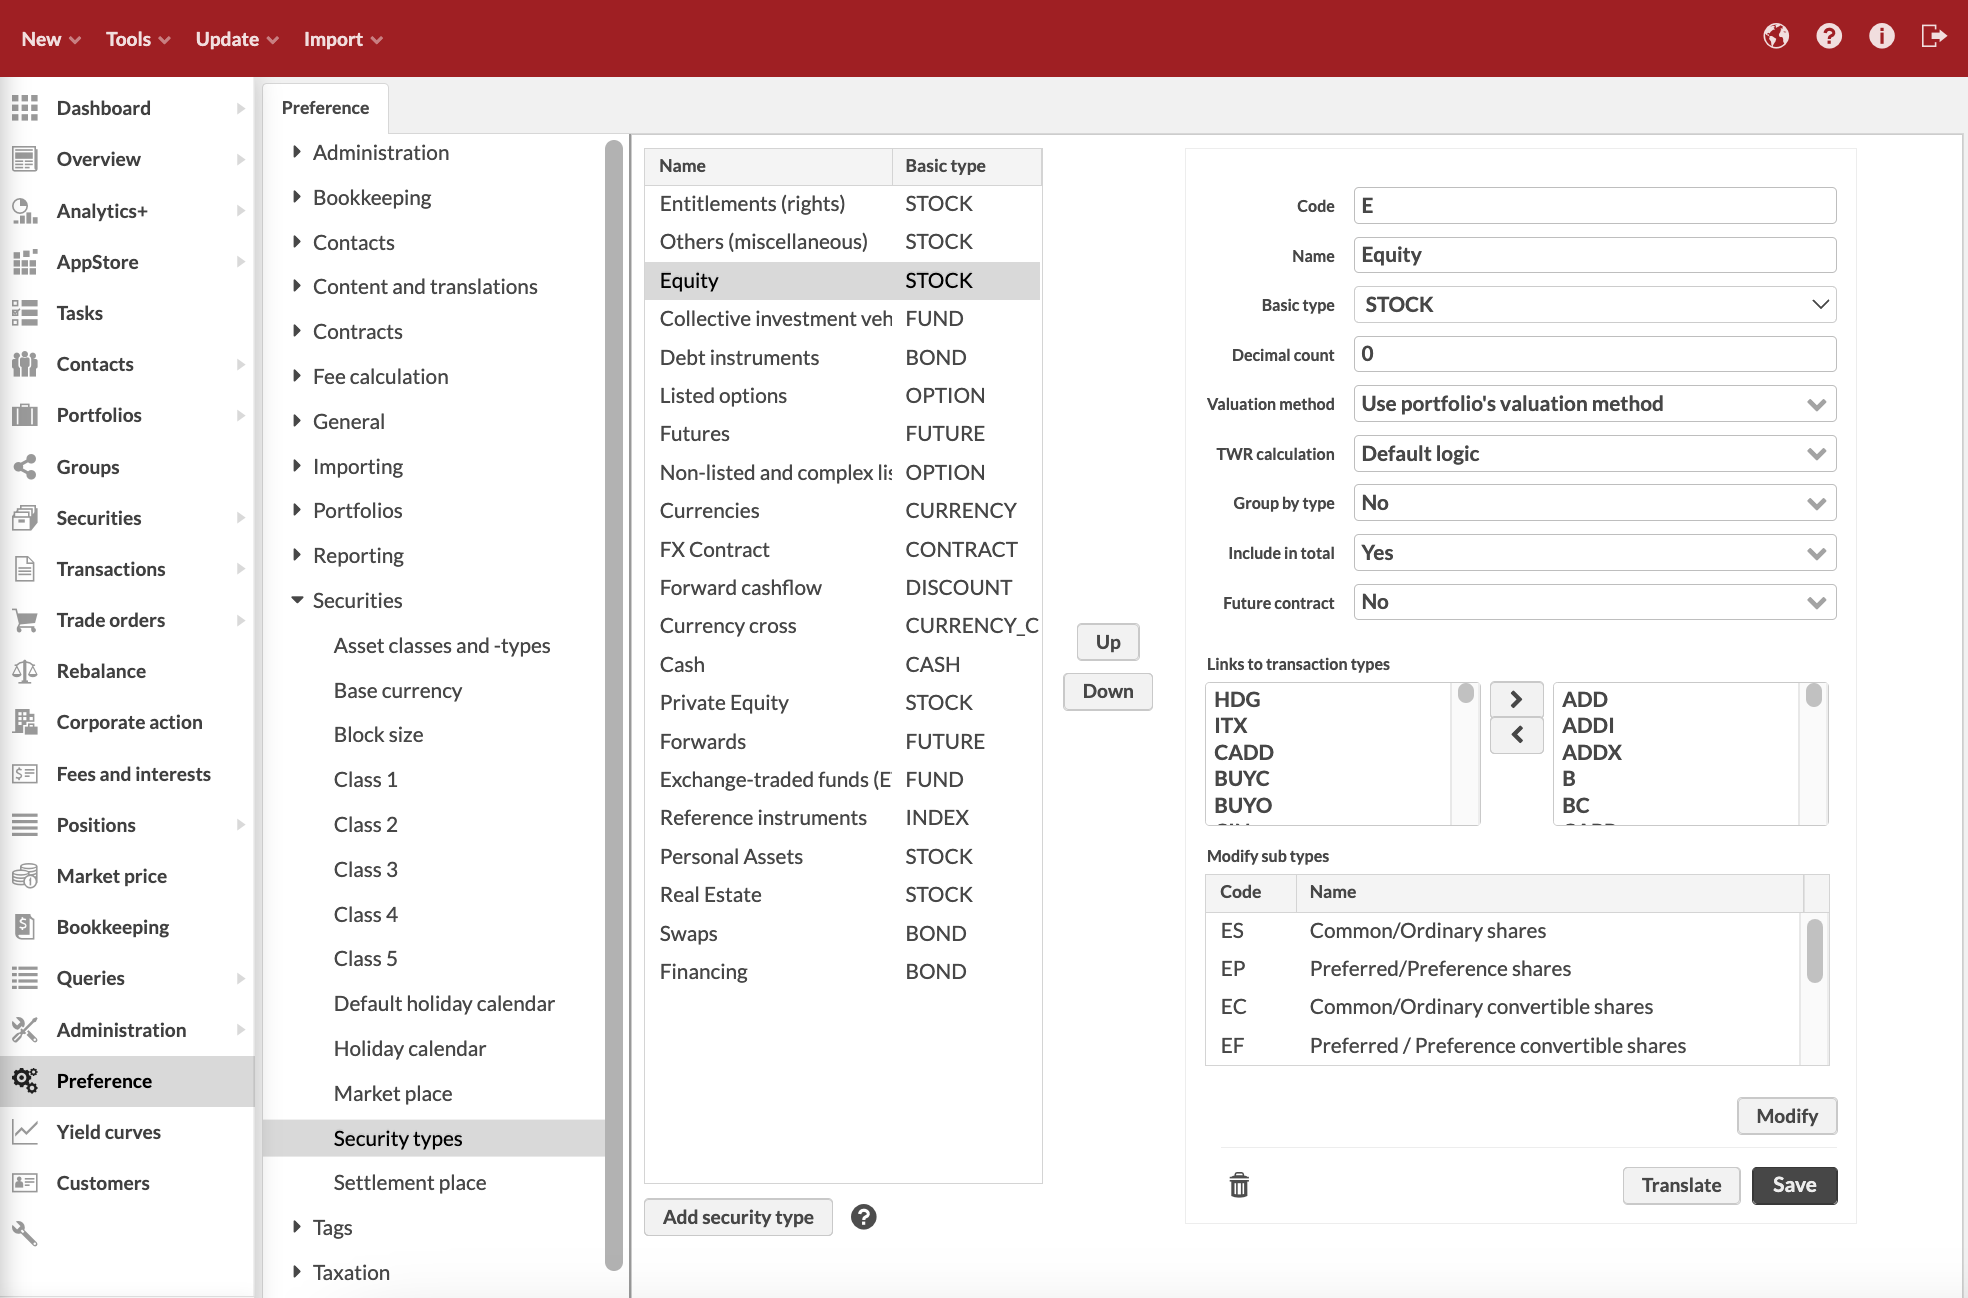
Security type preferences allow you to manage your security types. Existing security types are listed on the left - view the characteristics and modify the details of an existing security type by selecting it from the listing. The Translate button allows you to save translations for the security type to be used in reports and the user interface when a language other than the language of the security type is chosen.
Next to the security type listing, you can find two buttons, Up and Down. These buttons allow you to change the order of the security types in the listing: choose a security type you want to move, and move it up and down the listing with the buttons. Changing the order of the security types affects certain reports and the Overview: These functions order the securities shown based on the security type, and this order is defined by ordering the security types in the Security type preferences.
A new security type is added with the Add security type button. The security type information is defined in the fields on the right-hand side of the window (fields marked with * are required):
- Code*
The individual security type code that separates it from other security types.
- Name*
The name of the security type.
- Basic type*
Choose the basic type of the security from the alternatives: STOCK, BOND, OPTION, FUTURE, CASH, FUND, DISCOUNT, CURRENCY, DEPOSIT, INDEX, CURRENCY_CROSS, and CONTRACT. The basic type determines what kind of fields are available in the Security window and Transaction window, controls how the security type is handled when calculating your portfolio's positions, and controls where the security is selectable within the system. For more details, see the characteristics of Basic types below.
- Decimal count*
Define how many decimals are allowed for the amount in the cash transactions created for this security type. For security types with the base type CURRENCY, the decimal count also determines how many decimals are used to show "cash" within the system. For example, if you handle cash (prices, costs, taxes, trade amounts, etc.) with three decimals, set the CURRENCY security type's decimal count to 3.
You can also define the number of decimals on the security level in the Security window, Block size field. For details, see Security window.
- Valuation method
Define how the positions of this type are valuated within your portfolios through the alternatives: Use the portfolio's valuation method (default), Always use FIFO, or Always use average price. By default, all positions are valuated according to the valuation method you have set on your portfolio in your portfolio basic info - however, you can override the portfolio's valuation method on the security type level if needed. For example, your custody might valuate certain positions differently than you have chosen to valuate your portfolios - even though you value your portfolios with "average price", you can override the valuation for "futures" to always be "FIFO", or even though you value your portfolios with "FIFO", you can override the valuation for "private equity" to always be "average price".
- TWR calculation
Define which TWR calculation method is used for the security type. See TWR calculation logic for more details on the methods and related calculations. (Available from FA 3.8 onward)
Default logic - If security is defined to be “Future contract” in the security type configuration, the method is Exposure based, otherwise it is Market value based. Accounts/cash uses Carry costs/profits to portfolio level logic. This is the default selection for security types.
Based on market value - Use market value as the base value in the TWR calculation.
Based on exposure - Use absolute exposure as the base value in the TWR calculation.
Carry costs/profits to portfolio level - Uses market value based TWR, but carries costs/profits to the portfolio level. This means costs/profits does not affect the position level TWR but are taken into account on portfolio level TWR. Normally used e.g. on cash positions to aggregate up portfolio level costs to the portfolio level, and not show their effect on account level e.g. management fees.
Don't calculate TWR on position level - Does not calculate / show TWR on positions of securities of this security type.
- Group by type
Choose from the alternatives: No, Yes - same, or Yes - opposite. The selection defines, whether the securities are grouped by type in the reports, in other words, are positions shown separately (Yes) or calculated together (No).
- Include in total
Choose from the alternatives: Yes, No, Yes (change) or Yes (margin). The selection defines, whether the securities' market values are calculated in the portfolio total as the are (Yes) or not at all (No). Alternatively, the difference between the market value and purchase value can be added to the portfolio total (Yes (change)) or the margin account's value can be used to track the effect on the total value (Yes (margin)).
- Future contract
Choose from the alternatives: No, Yes - charge cost later, or Yes - charge cost immediately. The selection defines, whether the security is a forward type security and the transaction realizes in the future (Yes options) and whether the costs of such a transaction are charged immediately (Yes - charge cost immediately) or when the transaction realizes (Yes - charge cost later).
- Links to transaction types
Define the transaction types to be used with this security type, defined in the Transaction types preferences. The transaction types are listed with the transaction type codes defined in the transaction type preferences. The available transaction types are listed on the left-hand side of this section, and the transaction types linked to the security type are listed on the right-hand side section. A transaction type is linked to the security type by choosing the desired transaction type from the left-hand side listing and pressing the >> button when the transaction type is moved to the linked transaction types listing on the right-hand side. Similarly, a transaction type can be removed from the linked transaction types by choosing it from the right-hand side listing and pressing the << button. Only the transaction types linked to a security can be chosen as the transaction type of the transaction created to the security type.
- Subtype
The sub types defined for the security type. The subtypes are more detailed descriptions of the basic security types: for example, a security type bond could have subtypes fixed rate bond, floating rate note, convertible bond, and government bond. The subtypes are listed in this section: Subtypes can be modified with the Modify button below the subtype listing.
The security type is saved with the Save button below the fields.
Changes in security types are audited - user audit tracks changes users make in Security type preferences. Every time a user makes a change in security types, the user audit contains a message ”User [username] created/modified/deleted security type [code]”. (Available from FA 3.9 onward)
Characteristics of Basic types
A security's Basic type determines what kind of fields are available in the Security window and Transaction window for creating this type of a security or when creating transactions for this type of a security, controls how the security type is handled when calculating your portfolio's positions, and controls where the security is selectable within the system. The table below summarizes the built-in characteristics of the available Basic types.
Basic type | Security window | Transaction window | Position calculation |
|---|---|---|---|
STOCK | All standard security fields available. | ||
BOND | All standard security fields available. All Extra info fields available. | ||
OPTION | All standard security fields available. Selected Extra info fields available at the top of the tab. | ||
FUTURE | All standard security fields available. Selected Extra info fields available at the top of the tab. | ||
CASH | Not relevant / not used. Security types based on CASH are used to record cash transactions, without a link to a security. | ||
FUND | All standard security fields available. | ||
DISCOUNT | All standard security fields available. Selected Extra info fields available at the top of the tab. Security types based on DISCOUNT are also used when the system stores future cashflows on FX Contracts. Such securities are created automatically, and certain fields are disabled - more details. You can also create DISCOUNT securities manually. | ||
CURRENCY | Only relevant fields for currencies are available - more details. | ||
DEPOSIT | All standard security fields available. All Extra info fields available. | ||
INDEX | All standard security fields available. Selected Extra info fields available at the top of the tab. | ||
CURRENCY_CROSS | Only relevant fields for currency crosses are available - more details. | ||
CONTRACT | All standard security fields available. Security types based on CONTRACT are mainly used when the system stores FX Contracts. Such securities are created automatically, and certain fields are disabled - more details. |
Settlement place
In the Settlement place preferences, you can define the settlement places available for securities and transactions. The settlement place tells, where a transaction (or a security) is settled. For example, the settlement places can include settlements such as Euroclear.
Settlement places can be defined in the Settlement place window in Preference. A settlement place consists of a code and a name: the code is used to identify the settlement place in the system (if using for example SWIFT messages, define the valid BIC code for the settlement place), and the name is used to view and choose the settlement place in the user interface.