Set up a simple profile
This tutorial provides instructions on how to create a custom Know Your Customer (KYC) profile tab, add fields and restrict the profile tab to be available only for a certain contact type.
 |
Step 1 - Define the profile information and layout
First, create a new custom profile in FA Back:
Go to Preferences → Content and translations → Profile definitions and click Add new profile definition.
Fill in the fields:
Code: KycProfile.
Name: KYC Profile.
Where you want to use this profile: Contact.
Type: FA Back and FA Front (Vaadin design).
Restrict this profile to be shown to roles: Comma-separated user roles that a contact has to have for the profile to be shown.
Define criteria for when this profile is shown: Comma-separated criteria that need to be fulfilled for the profile to appear. For example, the string "type=1,status=A,juridical.code=PE" makes the profile only to appear for contacts with the Customer type, Active status and Private person juridical form.
In the editor at the bottom of the view, define the profile layout. A profile layout consists of two parts:
The head contains the namespace declarations to support custom UI components.
The body contains the layout where the components are added.
<!doctype html>
<html>
    <head>
        <meta name="package-mapping" content="custom:fi.fasolutions.app.pfmgmt.component"/>
        <meta name="package-mapping" content="fa:com.fasolutions.vaadin.components">
        <meta name="package-mapping" content="pop:com.fasolutions.vaadin.components.populatable">
    </head>
    <body>
        <vaadin-vertical-layout>

      </vaadin-vertical-layout>
    </body>
</html>
Click Save.
Step 2 - Add components to the profile
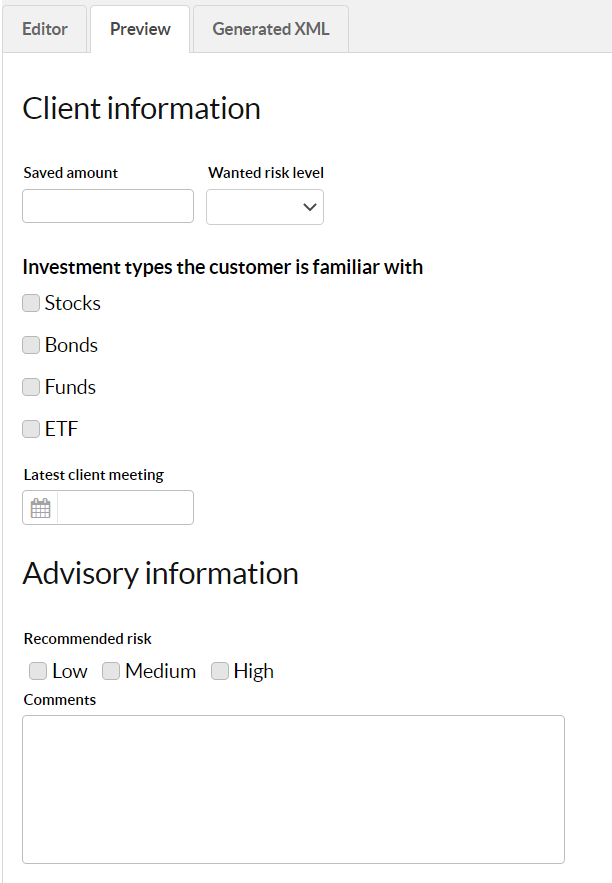
In the profile below, the Saved amount and Wanted risk level fields use the horizontal layout. The rest of the fields are arranged vertically. You can copy and paste the following sample code into the editor and the result should look like the picture below.
For the list of custom components you can use in a profile, see Custom components in a profile.
<!doctype html>
<html>
    <head>
        <meta name="package-mapping" content="custom:fi.fasolutions.app.pfmgmt.component"/>
        <meta name="package-mapping" content="fa:com.fasolutions.vaadin.components">
        <meta name="package-mapping" content="pop:com.fasolutions.vaadin.components.populatable">
    </head>
    <body>
        <vaadin-vertical-layout>
            <vaadin-label><h2>Client information</h2></vaadin-label> 1
            <vaadin-horizontal-layout> 2
                <fa-design-integer-field caption="Saved amount" id="investorProfile.savedAmount"/> 3
                <vaadin-native-select id="investorProfile.riskLevel" data-item-type="java.lang.String" caption="Wanted risk level"> 4
                    <option item="Low">Low</option>
                    <option item="Medium">Medium</option>
                    <option item="High">High</option>
                </vaadin-native-select>
            </vaadin-horizontal-layout>
            <vaadin-label><div style="margin-top:10px"><b>Investment types the customer is familiar with</b></div></vaadin-label> 5
            <vaadin-check-box id="investorProfile.stocks" caption="Stocks"></vaadin-check-box>
            <vaadin-check-box id="investorProfile.bonds" caption="Bonds"></vaadin-check-box>
            <vaadin-check-box id="investorProfile.funds" caption="Funds"></vaadin-check-box>
            <vaadin-check-box id="investorProfile.etf" caption="ETF"></vaadin-check-box>
            <custom-custom-popup-date-field id="investorProfile.latestMeeting" caption="Latest client meeting" date-format="yyyy-MM-dd"></custom-custom-popup-date-field> 6
            <vaadin-label><h2>Advisory information</h2></vaadin-label> 7
            <vaadin-css-layout size-small style-name="checkboxes" caption="Recommended risk"> 8
                <vaadin-check-box id="investorProfile.low" caption="Low"/>
                <vaadin-check-box id="investorProfile.medium" caption="Medium"/>
                <vaadin-check-box id="investorProfile.high" caption="High"/>
                <vaadin-label><style>.checkboxes .v-checkbox{ margin: 5px; }</style></vaadin-label> 9
            </vaadin-css-layout>
            <vaadin-text-area id="investorProfile.comments" width="250px" caption="Comments"/> 10
      </vaadin-vertical-layout>
    </body>
</html>Add the header. | |
Add the horizontal layout. | |
Add the integer field. | |
Add the native select dropdown. | |
Add the investment checkboxes. | |
Add the calendar field. | |
Add the header for the Advisory information. | |
Adds the checkboxes for recommended risk. | |
Adjust the spacing of the checkboxes. | |
Adds the text area field. |
Step 3 - Test the profile tab
Verify that the profile tab appears correctly by opening a contact with:
Type = Customer
Status = Active
Juridical form = Private person
Verify that the profile does not appear for contact with parameters that differ from the ones listed above.