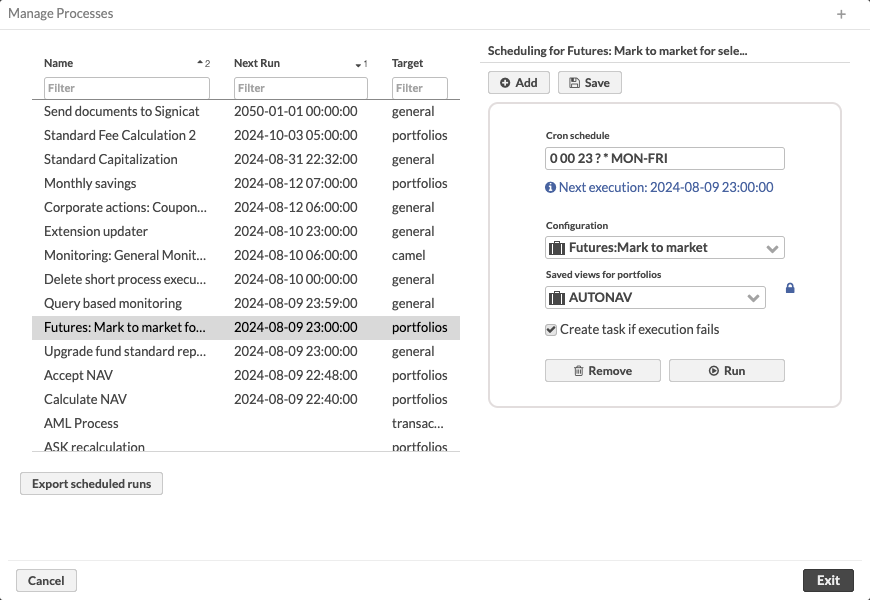
Scheduling
You can configure FA processes to run at specific times. The scheduling is done with Cron expressions.
If you have overlapping schedules, the system shows a warning. Five scheduled processes can run at the same time, but overlapping runs can cause issues if they affect the same data. For example, we don't recommend generating settlement and payment instructions for the same transactions simultaneously.
Create, edit and remove schedules
To create and manage schedules, open Tools → Administer → Scheduled functions in the top menu. After selecting a scheduled process, you can see the Cron schedule specified for it. This means a regular execution time has been set for the process.

To add a new schedule:
Click the Add button and fill in the fields:
- Cron schedule
- Configuration
- Saved views
Click Save to save the schedules. Alternatively, you can click Remove to delete a schedule.
Click the Run button to test your configurations. The functionality is run with the configuration set and saved view you specified.
Cron schedules
The schedules are specified in the Cron syntax. The basic principles are:
The schedules are specified in the following order, with space separating each component:
Seconds
Minutes
Hours
Day-of-month
Month
Day-of-week
Year (optional)
Asterisk ( * ) can be used to specify any value (for example, * as the Day-of-month component indicates that the schedule is run every day of the month).
Question mark (?) can be used in day-of-month and day-of-week fields to specify “no specific value”.
Some examples of different kinds of schedules:
Daily at 15:00:
0 0 15 * * ?
On the first second of the first minute of the 15th hour, every day of month and every month, regardless of the day-of-week
Every Friday at 12:30:
0 30 12 ? * FRI
Every weekday (Monday through Friday) at 08:10:20
20 10 08 ? * MON-FRI
On the first day of every month at 21:00
0 0 21 1 * ?
Export list of schedules
You can export scheduled runs as an XLSX file. This can help you, for example, to determine how to add a new schedule with as little overlap as possible. To export a list of scheduled runs, do the following:
Go to Tools → Administer → Scheduled functions.
Click Export scheduled runs.
An XLSX file is downloaded to your computer. The file contains the process ID, cron expression, run time (for the next 24 hours and one run thereafter), configuration name, namespace, view type and view name.